HOT NEW MARKDOWN EDITOR FOR MACOS

I just came across MarkEdit on Mastodon, and then instantly installed it. It’s advertised as being “TextEdit, but for Markdown” and it totally delivers on that.

A screenshot of this post, written in MarkEdit

Since I’ve started using my Mac more for general tinkering (instead of mostly just photos), I have not been able to find a decent no-nonsense Markdown editor. The options that go around seem to be:

  • MacDown, an open source split-screen editor which used to work quite well but has significant issues open for multiple years
  • IA Writer, Ulysses, and other “professional” apps. These are no doubt the best and most feature-complete, but for writing stuff here it seems like overkill.
  • TextMate/BBEdit/Atom/VS Code/etc. Having declared text editor bankruptcy by moving to Vim, I don’t really want to think about these. Plus their main focus isn’t going to be Markdown, and they’ll come with many more bells/whistles than I need.
  • Obsidian. This is what I had ended up using (and even writing a plugin) to write the file out to my GitHub Pages repo.

MarkEdit is really impressive for a project with an initial commit only two days ago (do people really scrub their version control history before publishing‽).

Since I’m writing this entirely to spread the news of a good app, I thought I’d ask ChatGPT to write a one-paragraph review:

Me: Write a one-paragraph review of MarkEdit, the new markdown editor for macOS. This review should be SEO-optimised for maximum engagement and clicks.


MarkEdit is a cutting-edge markdown editor for macOS users. Its sleek and intuitive design makes it easy to create and edit documents in markdown format, with features like live preview, robust syntax highlighting, and powerful editing tools. Whether you’re a seasoned writer or a beginner, MarkEdit offers a seamless experience for anyone looking to create high-quality, professional-looking documents in markdown. Its advanced feature set and user-friendly interface make it a top choice for anyone looking to take their writing to the next level. So, if you’re looking for the best markdown editor for your Mac, be sure to check out MarkEdit!

Couldn’t have said it better myself.


Dismissable Popup Shell in tmux

Ok so this is mostly a solution in search of a problem. Or a solution to the problem of “Will read the tmux man page too many times and wants to use all the features”. However there’s like a 5% chance this is actually useful, and it’s something that I’ve wanted to get working in tmux for a while. It turned out to be much simpler than I thought.

What I want is a persistent shell that I can quickly activate or dismiss to run simple commands - like checking the git status, making a commit, or finding a path to a file. What I usually do is open a split, run the command, and immediately close the split - I must open hundreds of new tmux panes each day. Gnome people might use Guake which does this inside the window manager.

So here’s the same thing working in tmux:

a screencast showing tmux with two panes, then an overlay window appears on top and a command is run before the overlay is dismissed

Anywhere in tmux I can press M-A (meta/alt-shift-a) and get a terminal window over the top of whatever I was doing. If I press M-A again, it will disappear - but any commands running in it will persist and can be brought back with the same keystroke.

This is based on the (somewhat recent) tmux display-popup feature, which runs a command in a window that floats over the top of your existing windows and panes. This is useful for utilities like fzf which can show the search pane inside a popup instead of in the shell itself. The popups have a limitation though - they are not treated like a tmux pane, the popup will only disappear when the command within it exits. So this makes my plan for a persistent shell in a dismissible popup seem difficult.

And it would be, if I wasn’t a massive tmux nerd.

How this works is that when you open the popup, it will create a super secret background tmux session. This session has the status bar hidden and all the keyboard shortcuts disabled, so it appears like it’s just a normal terminal. The popup then attaches to the background session using a new client (yep, that’s tmux within tmux). This gives you persistence between popups.

The background session actually has one key binding - M-A will detach from the session, exiting the client, and closing the popup.

The implementation turned out to be a lot simpler than I expected when I started:

# in tmux.conf
bind -n M-A display-popup -E show-tmux-popup.sh
bind -T popup M-A detach
# This lets us do scrollback and search within the popup
bind -T popup C-[ copy-mode

# in show-tmux-popup.sh, somewhere in $PATH
#!/bin/bash

session="_popup_$(tmux display -p '#S')"

if ! tmux has -t "$session" 2> /dev/null; then
  session_id="$(tmux new-session -dP -s "$session" -F '#{session_id}')"
  tmux set-option -s -t "$session_id" key-table popup
  tmux set-option -s -t "$session_id" status off
  tmux set-option -s -t "$session_id" prefix None
  session="$session_id"
fi

exec tmux attach -t "$session" > /dev/null

The key-table popup is what turns off all the keyboard shortcuts. It’s not actually turning anything off, it’s just enabling a collection of key bindings that doesn’t have any of the standard shortcuts in it - just the two we’ve added ourselves: one to detach and one for copy-mode.

You may be thinking “Will, won’t you end up with a bunch of weird secret sessions littered all over the place?” - if you were you’d be absolutely right. This is less than ideal, but where tmux closes a pane it opens a window. Or something. We can use the filter (-f) option to hide these secret sessions from anywhere that we see them, for example in choose-tree or list-sessions:

# in tmux.conf
bind -n M-s choose-tree -Zs -f '#{?#{m:_popup_*,#{session_name}},0,1}'

This will hide any sessions beginning with _popup_. The #{? starts a conditional, the #{m:_popup_.*,#{session_name}} does a match on the session name, and rows where the result is 0 are hidden. You get the idea.

The next step is to have some way of promoting a popup shell into a window in the parent session - in a similar way to how break-pane moves a pane into its own window. That’s a challenge for another day. UPDATE: I did this almost immediately, it was not very hard.

Have a look at my dotfiles repo on GitHub to see this config in context: tmux.conf and show-tmux-popup.sh.


Adding OpenGraph previews to Jekyll

I’m on a tear adding support for open web standards to my website(s) - if I’ve missed one, let me know. I’ve just added RSS meta tags which allow for feed reading plugins to suggest the RSS feed - rather than people having to find the RSS link (it’s at the bottom of the page) and paste that into their feed reader. There must be dozens of people who haven’t been reading my amazing content because it was too hard to add my site into their feed reader.

The other standard is OpenGraph which tells other services how to build a rich preview of your site. The obvious examples are links from social media sites (like Facebook, the author of the standard), or messaging apps:

a screenshot of an message showing a link to one of my blog posts, with a title and preview image

This is fairly simple to do, you just need to add some <meta> tags to the <head> of your site, for example my Jekyll template:


<meta property="og:url" content="{{ page.url | absolute_url }}">
<meta property="og:type" content="{% if page.type != null %}{{ page.type }}{% elsif page.layout == "post" %}article{% else %}website{% endif %}">
<meta property="og:title" content="{{ page.title }}">
<meta property="og:description" content="{{ site.description }}">
<meta property="og:image" content="{% if page.image != null %}{{ page.image }}{% else %}/images/me.jpg{% endif %}">

This will populate the correct URL (the absolute URL for the current page), guess the type either from a field on the page or whether it’s a post, and show a default image of me or a custom one specified by the page. This lets me customise posts with frontmatter:

---
title: "A custom OpenGraph post"
type: article
layout: post
image: /images/some-image.jpeg
---
# ... content of the post

I then checked using opengraph.xyz that my formatting was correct. As with most standards, different implementations with have varying quirks and may display things differently. Since I’m just adding a preview image, I’m not too fussed about 100% correctness.

This has also been done to my photos website so if a particular post is shared from there, it will get the preview thumbnail.


Create a Mastodon alias using GitHub Pages

If (like me) you’ve moved to Mastodon recently and are looking for a good way to show off some nerd cred, this is a great way to do it.

Mastodon (and the rest of the ActivityPub fediverse) use WebFinger to discover user accounts on other servers and across different services. It’s used as the way to get the user’s ActivityPub endpoint (which can potentially be on a different domain or non-standard path). We’re going to make use of the “different domain” feature here.

The idea is to plop your WebFinger information on your GitHub Pages-powered site, so that Mastodon can dereference something like @willhbr@willhbr.net to an actual Mastodon instance (in my case, ruby.social). There are some plugins to do this, but they don’t work with GitHub’s “no plugins unless you build the site yourself and upload the result” policy. So we’re going pluginless.

Firstly, get the WebFinger info for your Mastodon account:

$ curl 'https://$MASTODON_INSTANCE/.well-known/webfinger?resource=$USERNAME@$MASTODON_INSTANCE'

It should look something like:

{
  "subject": "acct:willhbr@ruby.social",
  "aliases": [
    "https://ruby.social/@willhbr",
    "https://ruby.social/users/willhbr"
  ],
  "links": [
    {
      "rel": "http://webfinger.net/rel/profile-page",
      "type": "text/html",
      "href": "https://ruby.social/@willhbr"
    },
    {
      "rel": "self",
      "type": "application/activity+json",
      "href": "https://ruby.social/users/willhbr"
    },
    {
      "rel": "http://ostatus.org/schema/1.0/subscribe",
      "template": "https://ruby.social/authorize_interaction?uri={uri}"
    }
  ]
}

Save that into /.well-known/webfinger in the root of your Jekyll site, and tell Jekyll to include the hidden directory when it builds:

# in _config.yml
include:
  - .well-known

Then just commit and push your site to GitHub. Once it’s deployed, you should be able to search for yourself: @anyrandomusername@$MY_WEBSITE_URL.

Since the server is static, it can’t change the response based on the resource query parameter, but since (I assume) you’re doing this for yourself on your personal website, that shouldn’t matter too much.

Needless Polishing

That’s cool, but we can do better. Replace the .well-known/webfinger file with a template:

---
---
{{ site.webfinger | jsonify }}

Then you can keep the WebFinger info in _config.yml so it’s more accessible (not in a hidden directory) and have it checked for syntax errors when your site builds. I’ve translated mine to YAML:

# in _config.yml
include:
  - .well-known

webfinger:
  subject: "acct:willhbr@ruby.social"
  aliases": ["https://ruby.social/@willhbr", "https://ruby.social/users/willhbr"]
  links:
    - rel: "http://webfinger.net/rel/profile-page"
      type: "text/html"
      href: "https://ruby.social/@willhbr"
    - rel: "self"
      type: "application/activity+json"
      href: "https://ruby.social/users/willhbr"
    - rel: "http://ostatus.org/schema/1.0/subscribe"
      template: "https://ruby.social/authorize_interaction?uri={uri}"

Nerd cred achieved, without a plugin. Toot me.


Shortcuts is a Cursed Minefield

This all starts with me wanting to host my photos outside of Instagram. I ended up using GitHub pages and wrote a simple iOS Shortcut to resize and recompress the image to make it suitable for serving on the web.

The shortcut is fairly simple - it takes an image, creates two versions (a main image and a thumbnail for the homepage), crops the thumbnail into a square to fit on the homepage grid, then saves the images to Working Copy ready to be published to GitHub Pages.

The problem arises when cropping the thumbnail. See what I need is:

image showing cropping/resizing

The image needs to be resized to that the shortest side is 600px long, and then crop the centre of that image to a square. Shortcuts has a built-in action for resizing the longest side to a certain length, but not the shortest side.

Instead you have to compare the width and height of the image and resize accordingly:

image showing if statement in shortcuts with resizing

However this gives me stretched out images for landscapes:

squished image after resize

After much head-scratching at what was going on, I figured it out. I was accessing the width and height of the image like this:

accessing height/width with photo media type

While debugging I could print this value and see the correct dimensions for the images that I was selecting. I tried assigning these to separate variables just in case there was some weird type-casting happening when they got passed to the if, but you can’t do less-than or greater-than on arbitrary shortcuts variables:

image showing no less/greater than

In a moment of desperation I swapped the Type to be “Image” rather than “Photo media” (getting desperate at this point), and it worked exactly as it should.

correctly resized and cropped image

Being thorough, I tried changing the Type back to “Photo media”… and it also worked. I made a new shortcut and left it at the default of “Photo media”… and it failed again.

The shortcut would only work if I either left the Type as “Image”, or set it to “Image” and then set it back, obviously flipping some invisible internal value1 of the shortcut to correctly compare the width and height.

No programming language, API, library, or framework has made me as frustrated as writing even the most trivial Shortcuts.

  1. I briefly tried inspecting the internals of the .shortcut file as I have done before, but the signing that is now included made that more difficult than I had enthusiasm for. 


The Good & Bad of Photos for MacOS

I’ve previously written about how iOS/iPadOS is poorly suited to anything more than casual photography.

Unsurprisingly there hasn’t been a change in iPadOS’s capabilities since 2019. However through a fortunate series of events I’ve found myself in possession of an M1 MacBook Air, and have been using that for storing/editing my photos for the last year or so.

As well as ending up on Instagram, my photos also end up on a real website.

The Good

Reviewing and flagging photos on MacOS is much quicker and easier than on iPadOS. The arrow keys move instantly between photos (instead of having to swipe and see an animation), which means you can have a more direct comparison between two shots. Pressing “.” quickly favourites a photo, which I use to mark a photo as a possible editing opportunity. Deleting photos or removing them from an album can be done with one shortcut – no annoying confirmation required every time. These few things alone make it much easier for me to scan through my photos, find the best ones, and clear out any obvious rubbish.

On iPadOS you still have to manually unfavourite every single photo, which makes using favourites as a staging area impractical and frustrating. (Darkroom has implemented their own “flag/reject” system as a workaround, but I was already using MacOS at this point).

Photos on MacOS has a much more robust and mature album system – the best feature being smart albums. This lets me have an “Edited” smart album that just shows edited photos. Some apps on iPadOS will add edited photos to their own album, but that’s limited per-app and depends on how it integrates with the photos library. Smart albums are also much more flexible – you can filter by camera model, shutter speed, aperture, date, etc. So it’s completely trivial to do something like find all the long exposure shots from my new camera that have been edited.

Of course the real advantage to MacOS is that the photos library lives in the file system, and I can just go and look at it. The real, original bytes that came from my camera are fully within my grasp – I don’t have to worry about transparent re-encoding as I move them around – and I can actually back them up to somewhere that isn’t iCloud or Google Photos. I can include them in Time Machine, I can copy them to an external drive, or I can create my own janky system that uses rsync to copy them to a Raspberry Pi sitting on my network.

I also now have access to more advanced or flexible software. As much as I like Pixelmator Photo it is limited to only making colour adjustments to a single layer. Pixelmator Pro on the other hand has all the same features (even with the same UI) but has layers (and layer masks!), effects (blurring and suchlike), and painting tools. This makes it possible to do things like merge multiple fireworks shots into one picture, or fake the motion of many ferries at once.

fireworks photo with implausible number of fireworks

In addition to Pixelmator Pro, I’ve also found use in single-purpose utilities like Starry Landscape Stacker and Panorama Stitcher – which has come in useful with my still-quite-new DJI Mini 2.

While none of this is impossible on iPadOS, these tools are made with the assumption of a more serious use – for example I can stitch together 20 raw images from my a6500 and get a 1GB TIFF out the other end. Not a single pixel of data is lost, and the software on MacOS can scale to handle it without hitting any limits.

The Bad

While much of the software around Photos on MacOS is built for serious users, Photos itself is still lacking. For example, when you export a JPEG, you get a few pre-defined choices for quality instead of a slider. I’d like to export at 95% quality, but instead I’m stuck with whatever “high” or “maximum” mean (probably 80% and 100%). I could probably work around this with Shortcuts, but that’s another whole can of worms.

Apps can integrate their editing UI directly into Photos – but there isn’t a quick way to jump straight to editing in a specific app, you’ve got to open the default Photos editor and then open it in the app you actually want. There is a way to jump directly to an app, but it doesn’t support preserving the adjustments you made, you just get a new image with the adjustments baked in. So if you want to do a complex edit where you might come back later to tweak it, this is no good.

The editing UI in Photos also limits you to using one window, since Photos itself only supports a single window. This is the kind of limitation I’d expect on iPadOS, not on MacOS.

Backing up with Time Machine is a terrible experience. Not specific to Photos, but this is what pushed me to make a custom solution using rsync. Backing up to a NAS appears to be almost impossible (without buying a Synology or something else that has worked out how to trick MacOS into using it as a backup target), and backing up to an external disk is horrendously slow and temperamental. MacOS also fights you with permissions issues trying to read the contents of the photo library – the permissions changes added in MacOS Catalina do not mesh well with any kind of custom script (even Apple’s own launchd doesn’t work with it), which makes custom backups harder to implement and rely on.

I opted to get the 1T SSD in my MacBook, since I knew I wanted enough storage to keep me going for a few years. There doesn’t seem to be any particularly well-supported way of splitting a Photos library in two, so that part of it can be offloaded to archival storage. You can do it by duplicating the photo library itself, archiving one copy, then delete all the old photos from the unarchived copy. My photo library currently takes up 500G and I’m not looking forward to having to split it. This is an obvious “strategy tax” that Photos pays when the recommended thing to do when you run out of local storage is to pay for iCloud storage. However that only goes up to 2T and what do you do then?

The experience of using MacOS to manage and edit photos is far better than iPadOS. I do still miss being able to twiddle my Apple Pencil while thinking of how I wanted to apply my edits, and do it without a keyboard in the way. Additionally, you get a way better screen on an iPad for a similar price as a MacBook Air.

Now that I’ve made the shift to MacOS, the iPad would have to do something amazing for me to switch back.


OH! A side note, did you know there’s no way to import a photo library from an iOS device to MacOS? You can import the photos (either directly from the Photos app, or using Photo Capture) but this doesn’t import any albums, or edit history. I’m fairly sure I’ve lost some originals in the process of importing pictures from my iPad – and the only way I can see to do it is upload it all to iCloud and re-download it on MacOS, or write your own app to write all the photos to some external storage connected to the iPad, along with custom metadata, and then write a MacOS app that imports them back. You just have to ignore the fact that external storage still is terribly limited and unreliable on iPadOS.


Configure Nebula VPN on iOS/Android

Nebula is now available on iOS and Android, which is very exciting. What is less exciting is the fact I couldn’t find any documentation on how to set it up. You’re in luck though, because that’s just what I’ve got here - how to setup Nebula on a server, and connect that to a mobile device.

Setup Nebula on a server

Installing Nebula is a fairly straightforward (but manual) process. It’s not available in any PPAs (that I know of), so it’s a bit involved.

On the server that will be your lighthouse (ie a server that has a public static IP, and can open a port to the outside world).

  1. Download the latest release for your platform from GitHub.
  2. Extract the archive and put nebula and nebula-cert somewhere in your $PATH - like /usr/local/bin. Make sure they’re executable: sudo chmod +x /usr/local/bin/nebula*.
  3. Download the example config to /etc/nebula/config.yml.

Now let’s generate some certificates! Generate a CA cert:

$ nebula-cert ca -name "My Mesh Network"

You should now have ca.key and ca.crt. Keep ca.key super secret - anyone that has access to that has the ability to add new nodes to your network!

Generate a cert for the lighthouse node:

$ nebula-cert sign -name "lighthouse" -ip "10.45.54.1/24"

The IP address can be anything in the range of private network address space. Easiest thing to do is just 10.X.Y.Z - but choose IPs that aren’t already common on private networks! Many routers give out 10.1.1.X, and so your VPN could clash with devices on your network.

You should now also have lighthouse.crt and lighthouse.key. You can repeat the nebula-cert sign command for each node in the network - giving them each their own IP.

Now update the config.yml with the VPN IP and external IP/port of your lighthouse. Find the section like this:

static_host_map:
  # "<Nebula VPN IP>": ["<external IP or addresss>:<port>"]
  # eg:
  "10.45.54.1": ["185.199.108.153:4242"]

This allows new nodes to make their initial connection. The external address can be a URL (I actually use a dynamic DNS provider to point to my home computer). The port must be open to the outside world, and listed in the listen section:

listen:
  host: 0.0.0.0
  port: 4242

For lighthouses, you need to set am_lighthouse: true. For all other nodes you need to set lighthouse.hosts to a list of the Nebula IPs of the lighthouses. See the example config file for more info, and all the other options you can set.

You can now start nebula:

$ nebula -config /etc/nebula/config.yml

If you want to run it in the background and have it run at boot - look at the service scripts.

Setup on iOS/Android

Get the app (iOS/Android). Click “+” to add a new config, and copy the public key for the device (from the “Certificate” screen) onto your machine that has ca.key on it.

Sign the key using ca.key:

$ nebula-cert sign -ca-crt ./ca.crt \
  -ca-key ./ca.key -in-pub <mobile key file> \
  -name <device name> -ip 10.45.54.2/24

This should produce <device name>.crt. Copy that and ca.crt back to your phone.

Paste the contents of <device name>.crt onto the “certificate” screen, and the contents of ca.crt onto the “CA” screen. Click “Load certificate”/”Load CA” after pasting each cert.

In the “hosts” screen, set the IP of your lighthouse, as well as its public IP and port. Flip the “lighthouse” toggle on.

Once you’ve entered that, you can save the config. This should prompt a system dialog to enter your passcode to add the new VPN config. You can then use the Nebula app or VPN settings screen to enable Nebula. It will take a second to connect, then you should be able to access all the devices on your VPN.

Simple!


Impracticalities of iOS Photo Management for Photographers

In the last six months or so I have become an enthusiastic hobbyist photographer. This started with paying more attention to how I used the camera on my phone, then quickly progressed into buying a Sony a6000 mirrorless camera. Before I knew it I had two tripods, a camera bag, an ND filter, and was starting to browse through lenses on Amazon.

These photos usually end up on my Instagram. Here’s one from the other day:

The Sydney Harbour Bridge at sunset

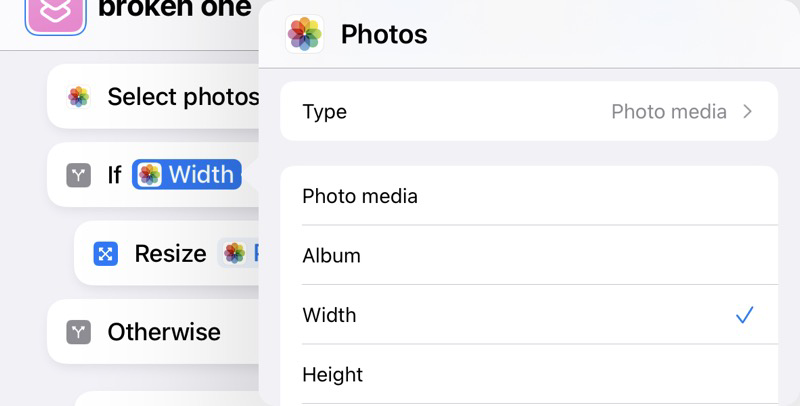
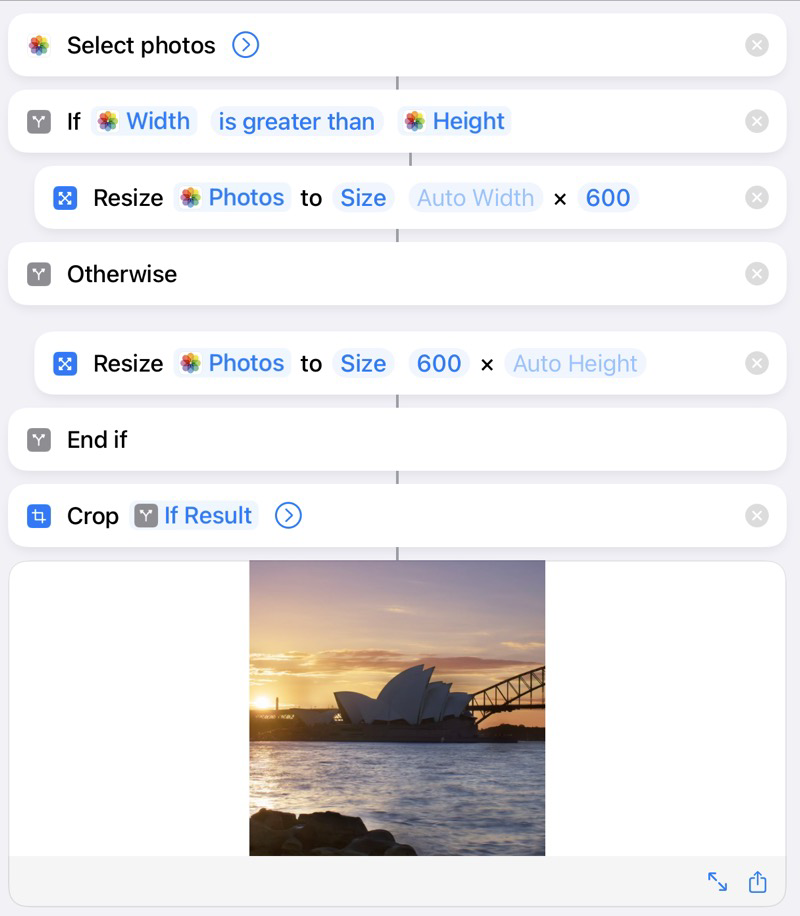
All the photos that I take on my camera are edited on my iPad using Pixelmator Photo. It’s an amazingly powerful piece of software - especially considering that it’s less than $10.

Importing and editing photos from a camera is easy on iOS. You just need the appropriate dongle - in this case it’s just a USB C SD card reader - and tap “Import” in the Photos app. It removes duplicates and can even clear the photos off the card once the import is complete. What more could you want?

Much, much more.

The problem first started when a friend of mine suggested that I start shooting raw photos to make use of the extra dynamic range. If you’re not aware, raw photos contain very little processing from the camera and are not compressed - unlike jpegs. On the a6000 a typical jpeg is less than 10MB, whereas a raw photo is 24MB. This meant that whenever I took my camera anywhere, I could easily produce 20GB of photos instead of the more reasonable 1-2GB.

There are two big problems here:

  1. my iPad only has 250GB of storage
  2. my home internet is too slow to upload this many photos to Google Photos1

My first thought was to just dump my unused photos onto an external drive (now that iOS 13 adds support for them natively) and delete them from my iPad. This works OK for video - you have a handful of files, each of which are a few gigabytes. Background processing isn’t great in iOS, but I can deal with having to keep the app open in the foreground while the copy is happening.

This is not the case with photos. You instead have hundreds and hundreds of small files, so if the copy fails you have no idea how much you have to continue with. That being said, if you were shooting jpegs, you could do something like:

  1. import into the Photos app
  2. swap the SD card out for an external drive
  3. select all the photos you just imported (hoping that you can just select in a date range)
  4. drag the photos into a folder on the external drive
  5. baby sit the Files app while it copies

Less than ideal, but workable. Ok, now why won’t that work for raw files?

iOS kinda only pretends that it supports raw files. If you import them into the Photos app there is no indication of the file type, but third party apps can access the raw data. What’s frustrating is that when you export the photos, only the jpeg is exported. So if you try and drag raw photos onto an external drive, you lose the raw data.

Basically, Photos on iOS is a one-way street for raw images. They’ll be imported, but can’t be exported anywhere without silent data loss.

Alright so using the Photos app is a bit of a loss. Can we just keep all the images as files instead? The short answer is “not very well”.

Importing from an SD card to the Files app can only be done as a copy - no duplicate detection, no progress indication, etc. You just have to sit there hoping that nothing is being lost, and if it fails in the middle you probably just have to start again.

Once the photos are in the Files app, you have to do the same dance again to export them to your external drive. Cross your fingers and hope that nothing gets lost.

Also remember that once the photos have been exported, the Files app will be unable to show the contents of the folder - it’ll just sit on “Loading” presumably trying to read every file and generate hundreds of thumbnails. And there’s no way to unmount the drive to ensure that the data has been correctly flushed to disk, you just have to pull the cable out and hope for the best.

Thankfully Pixelmator Photo does support opening images from the Files app, so you can import them from there without much trouble. But there is no way to quickly delete photos that weren’t in focus or get rid of the bad shots out of a burst. (This isn’t great in the Photos app either, but at least the previewing is acceptable).

So you’re left with a bunch of files on your iPad that you have to manage yourself, and a backup of photos on your external drive that you can’t look at unless you read the whole lot back. Not good.

“Why don’t you just use a Mac” - the software that I know how to use is on iOS. My iPad is faster than my Mac2. The screen is better. I can use the Pencil to make fine adjustments.

“Why not use Lightroom and backup to Adobe CC” - I don’t want to have to pay an increasing recurring cost for something that is a hobby. Also I like using Pixelmator Photo (or Darkroom, or regular Pixelmator, or maybe Affinity Photo when I get around to learning how it works).

“Just get an iPad with more storage” - I’d still have the same problem, just in about a year.

This is the point in the blog post that I would like to be able to say that I have a neat and tidy solution. But I don’t. This is a constant frustration that stops me from being able to enjoy photography, because for every photo I take I know that I’m just making everything harder and harder to manage.

One solution could be to connect my external drive to my home server, and find an app that allows me to backup to that. This seems ridiculous as my iPad can write to the drive directly.

I think the only thing that can make this practical - outside of iOS getting much better at managing external drives - is to make an app that reads the full image data from Photos, and writes to a directory on an external drive. It could also keep a record of what it has exported, and allow for cleaning up any photos that didn’t get edited automatically. The workflow would look something like:

  1. attach SD card and import into Photos app
  2. attach external drive and use photo exporting app to copy new photos onto the drive
  3. edit/delete photos using any app that takes your fancy
  4. use photo export app to remove any photo that wasn’t edited or marked in some way (eg, favorited) in one go

This would patch over the poor experience of copying to external drives, making iOS-only photography more practical for people who don’t want to pay for cloud storage for hundreds of mediocre shots.

Here’s hoping that iOS will continue to improve and become more flexible for different workflows.

If you’re an iOS developer who wants to make an app with probably the most limited appeal ever, get in touch.

  1. I will sometimes take my iPad to work and let it upload on the much better connection there, but this is inconvenient. 

  2. Probably. 


Compiling for Shortcuts

In this video I show a program written in Cub being compiled and run inside of the iOS Shortcuts app. The program is a simple recursive factorial function, and I can use it to calculate the factorial of 5 to be 120. Super useful stuff.

The idea was first floated by Andrew - who knows that I am someone that is easily nerd-sniped by programming language problems. Even after I pointed out that Shortcuts doesn’t support functions (or any kind of jump command other than conditionals) and a whole host of other features that you’d expect in the most basic set of machine instructions. But the bar had been set.

Initially I started writing a parser for a whole new language, but quickly discarded that idea because writing parsers takes time and patience. Why not just steal someone else’s work? I’d seen Louis D’hauwe tinkering on Cub, a programming language that he wrote for use in OpenTerm - which is written entirely in Swift. After a quick look into the code I realised that it would be simple to just use the lexer and parser from Cub and ignore the actual runtime, just leaving me to do the code generation. All I have to do was traverse the syntax tree and generate a Shortcuts file. In terms of code this is fairly straightforward - just add an extension to each AST node that generates the corresponding code.

Over a few evenings I pulled together the basic functionality - after reverse-engineering the Shortcuts plist format by making a lot of shortcuts and airdropping them to my Mac (Josh Farrant ended up doing a similar thing for Shortcuts.fun, and he’s written about the internals a bit on Medium).

The main problem was how to invent functions in an environment that has no concept of them. Andrew suggested making each function a separate shortcut - and just having a consistent naming convention that includes the function name somewhere - which would work but would make installing them a complete pain. However if you assume you know the name of the current shortcut, you can put every function in one shortcut and just have it call itself with an argument that tells it which function to run. An incredibly hacky and slow solution (as you can see in the video) but it works - even for functions with multiple arguments!

A lot of debugging and crashing Shortcuts later, I had a working compiler that could do mathematical operations, conditionals, loops, and function calls - all being turned into drag-and-droppable blocks in the Shortcuts app. Like using CAD to design your Duplo house.

The main shortcoming with this hack is that every action has a non-obvious (and non-documented) identifier and argument scheme that you have to reverse engineer for every action. If this was going to be a general-purpose solution, you’d have to deconstruct all the options for every action and map this to an equivalent API in Cub.

If you’re intrigued you can run the compiler yourself (be warned; it is janky). All you need is Swift 4.2 and the code from GitHub.


Learning Software Engineering

It’s an often-repeated meme that school doesn’t teach you the things you need to know to get by in the working world. “I don’t know how to do taxes but at least I can solve differential equations, har har” is usually how they go. There is a sub-meme in Software Engineering that the things you learn at university are generally not applicable to what is needed in the industry - most jobs don’t require you to be able to implement an in-place quicksort or balance a binary tree.

I generally agree with this sentiment - I now have a job and am yet to implement any kind of sorting algorithm or tree structure as part of my day-to-day responsibilities. Although I think the main problem here is comparing the Computer Science curriculum with the needs of the Software Engineering industry - like if you were to expect physics students to graduate and work as mechanical engineers1.

The thing that I find frustrating is the distain towards group projects - whether it’s cramming all the work in at the last minute, group members not pulling their weight, etc. No one likes group projects, and can you blame them? They’re nothing like working in the real world. This blog post by James Hood gives a good comparison of what it’s like doing work at school vs in industry. It’s not aimed specifically at group projects, but this summary shows how James perceives group projects:

“Sure, we may get the occasional group project, however that’s generally the exception. In these group projects, it’s not uncommon for one or two individuals to end up doing most of the work while the rest of the team coasts.”

The core difference is that when working in the industry, deadlines either aren’t concrete - and if they are and you’re not on track to meet them, a good team will work out how to work together and reach it - on top of that the scope can be changed in collaboration with the client or project owner if the deadline can’t be met. And unless you work in the games industry where a death march is the accepted project management practice, you should have some kind of work/life balance where you are not spending every moment of your day pushing to complete the project.

What I think is the problem with group projects is that they need to go big or not bother - especially projects done in smaller groups or in pairs. If you give a small project to a pair of students, it’s quite likely that one of them can just get on a roll and churn through the majority of the project. I have done this and it’s not good for either party.

This is exacerbated when the project doesn’t have N obvious parts that can be allocated one to each team member. If the parts have to interact then the team member that does theirs first or makes the most used part will become the go-to person in working out how all the other parts should integrate - doing more work than anyone else.

This is basically distilled down to “you research it and I’ll write the report” - but then the person that does the research has to write a report to transfer the knowledge of what they researched. Just replace “research” and “write report” with the components of the project.

What makes a worthwhile group project for software engineers? In the third year of my degree (which was four years in total) we had a group project that lasted the whole year. I think almost everyone in the class learnt a lot about working successfully in a team, as well as learning software engineering skills that you don’t pick up working by yourself.

The course outline looks like this:

The Software Engineering group project gives students in-depth experience in developing software applications in groups. Participants work in groups to develop a complex real application. At the end of this course you will have practiced the skills required to be a Software Engineer in the real world, including gaining the required skills to be able to develop complex applications, dealing with vague (and often conflicting) customer requirements, working under pressure and being a valuable member of a software development team.

There are a lot of small things that make this course work, but I’m just going to mention a few of the most significant:

Firstly having a massive project that is too big for one person to do or to cram in at the start of the year, it is always big enough that you can’t see the whole scope and how things fit together until you’ve finished the initial parts - this forces the team to work sustainably and discourages cramming it all at the last minute or trying to get everything out of the way. This should guide the team to get into a consistent rhythm.

The team should reflect the size of an industry software engineering team - about six to ten people. I think seven is a good size - it is small enough that everyone can keep up-to-date with the rest of the team, but big enough to produce a sizeable amount of work throughout the year.

Instead of having a single deadline at the end of the project where the team dumps a load of work and promptly forgets about it, the team should at least be getting feedback on how their development process is improving. Ideally, teachers would be able to do significant analysis into how the team is working - incorporating both data gathered from the codebase, the development process, and subjective feedback from students.

This analysis is a massive amount of work, and is hard to get right - my final year project was to improve the analysis of code. I didn’t improve it an awful lot but learnt a lot about syntax trees, Gumtree and Git.

The team should be marked on their ability to work as a team, and improve their process over the year - as well as the quality of the actual project work that they complete. This gives them the ability to improve their development process - perhaps at the expense of number of features - but hopefully becoming more sustainable and improving other “soft skills”.

This kind of work also has the added benefit of teaching students how to deal with typical industry tools, like getting into a Git merge hell, opening a bunch of bugs in an issue tracker and ignoring them for months, dutifully splitting all their work into stories and tasks and never updating them as the work gets done, receiving panicked Slack messages late at night then working out whether you can get away with ignoring them, and realising that time tracking is a punishment that no one deserves before fudging their timesheet at the end of the day. Proper valuable skills that software engineers use every day.

Of course this means that if you’re planning a project that is only a few weeks long and doesn’t make up much of the marks in the course, it probably shouldn’t be a given out as a group project.

Just like computer science is more more than just writing programs - you learn about algorithms, data structures, complexity analysis, etc - software engineering is not just computer science. Learning to be a software engineer also includes the ever-dreaded soft-skills and learning how to actually put together a piece of software that will be used by other people. And so just like in computer science there is far more than just learning how to program, software engineering must be far more than just learning computer science with other people.

  1. This may be a bad analogy, I have not studied physics since my first year of university and don’t really know what mechanical engineers do day-to-day. But I’m sure you get the gist.