The Curse of Knowledge

The curse of knowledge is the idea that as you become more of an expert in an area, it becomes harder to explain basic concepts in that area, because your assumed based level of knowledge is much greater than the typical level of understanding. Basically you might try and explain at an undergraduate level, but in reality you need to start from a high school level and build up from there. You forget the difficulty of grasping the key concepts of the topic.

A similar phenomenon happens when you try and make a “simple” version of something, which requires you to become an expert in the thing you’re attempting to simplify. Once you’ve become an expert, you understand the edge cases, tradeoffs, and other complexities in the system, and often you’re able to use the complex thing without needing it to be simplified, and appreciate why it is not simple in the first place. You’re then left to explain the subtleties of this complex system to people that have yet to make the leap in understanding—and experience the difficulty of explaining something it in basic terms.

I went through this whole process with tmux. Before I was a certified tmux nerd, I wanted a simpler way of configuring and controlling my tmux panes. The binding and manipulation controls seemed too limited, I wanted to be able to send commands to different tabs and split the output of commands to different panes. I managed to do some of this by hacking small scripts together, but I wanted a solution that would unify it all into one system.

There are a few projects that do similar things (like tmuxinator), but they are mostly focussed on automatic pane/window creation, rather than adding scripting to your interaction with tmux.

So I spent months learning the ins and outs of tmux’s command-line interface, and the functionality available in control mode. Eventually I had a program that ran alongside tmux and provided an object-oriented scripting interface to basically the entirety of tmux. You could do something like:

server.on_new_session do |session|
  session.on_new_window do |window|
    window.panes.first.split :vertical
  end
end

Under many layers of abstraction, this would listen for events in tmux, run the associated Ruby code, and send any commands back to tmux if the model had changed. It was a wonderful hack, and I’m still very happy with how it all fit together.

However, in doing so I learnt a lot about the tmux CLI, and started to get a fairly in-depth understanding of how it had been designed.

Ok I need to share just how neat the tmux API is. It’s all really well documented on the man page. Control mode outputs tmux events to stdout, so if you read from that process you can receive what’s happening with every tmux session on a server—input, output, layout changes, new windows, etc. You can also write commands into stdin of the control mode process, and their output will be returned as a control mode message.

Most tmux commands print some kind of output, by default it’s somewhat human-readable, intended to display in a terminal. Take tmux list-sessions as an example:

$ tmux list-sessions
flight-tracker: 2 windows (created Fri Jul 28 10:41:53 2023)
pixelfed-piper: 1 windows (created Fri Jul 28 11:14:18 2023)
pod: 3 windows (created Sat Jul 29 03:17:47 2023)
willhbr-github-io: 2 windows (created Fri Jul 28 11:13:50 2023) (attached)

It would be really annoying to write a script to parse that into a useful data structure (especially for every single command!), and thankfully we don’t have to! Every tmux command that prints output also supports a format string to specify what to print and how to print it:

$ tmux list-sessions -F '#{session_id}||#{session_name}||#{session_created}'
$1||flight-tracker||1690540913
$3||pixelfed-piper||1690542858
$4||pod||1690600667
$2||willhbr-github-io||1690542830

The only logical thing for me to do was write an RPC-like abstraction over the top of this, with macros to map fields in the generated format string to attributes on the objects that should be returned. This allowed me to build a fairly robust abstraction on top of tmux.

After that I started learning about all the features that tmux supports. Almost every option can be applied to a single pane (most normal people would apply them globally, but if you want they can be applied to a just one session, window, or pane)—so if you want one window with a background that’s unique, you can totally do that. You can also define hooks that run when certain events happen. You can remap keys (not just after the prefix, any key at all) and have arbitrary key “tables” that contain different key remappings. Windows can be linked for some reason—I still don’t know what this would be used for—and you can pipe the output of a pane into a command. Exactly how all these features should be used together is left as an exercise for the user, but they’re all there ready to be used.

With this much deeper understanding of how to use the tmux API, I no longer really needed a scripting abstraction, I was able to pull together the existing shell-based API and do the handful of things that I’d be aiming to accomplish (like my popup shell). I’d basically cursed myself with the knowledge of tmux, and now a simple interface wasn’t necessary. So I abandoned the project.

One of my software development Hot Takes™ is that git has an absolutely awful command-line interface.1 The commands are bizarrely named, it provides no guidance on the “right” or “recommended” way of using it,2 and because of this it is trivial to get yourself in a situation that you don’t know how to recover from. Most git “apologists” will just say that you should either use a GUI, or just alias a bunch of commands and never deviate from those. The end result being that developers don’t have access to the incredibly powerful version control system that they’re using, and constantly have to bend their workflow to suit the “safe” part of its API.

The easiest example of something that I would like to be able to do in git is a partial commit—take some chunks from my working copy and commit them, leaving the rest unstaged. The interface for staging and unstaging files is already fairly obtuse, and then if you want to commit only some of the changes to a file, you’re in for a whole different flavour of frustration.

  • git add stages a file (either tracked or untracked)
  • git restore --staged removes a file from being staged
  • git restore discards changes to an unstaged file

Why we haven’t settled on a foo/unfoo naming convention completely baffles me. stage/unstage and track/untrack tell you what they’re doing. restore --staged especially doesn’t match what it does—the manual for git-restore starts out saying it will “restore specified paths in the working tree with some contents from a restore source”, but it’s also used to remove files from the pre-commit staging area? That doesn’t involve restoring the contents of a file at all. Just read the excellent git koans by Steve Losh to understand how I feel trying to understand the git interface.3

What I really want is an opinionated wrapper around git that will make a clear “correct” path for me to follow, with terminology that matches the actions that I want to take. Of course the only correct opinionated wrapper would be my opinionated wrapper, which means I need to make it. And of course for me to make it, I need to have a really good understanding of how git works—so that I can make an appropriate abstraction on top of it.

So this is where I’ve ended up, I want to make an abstraction over git, which would require me to learn a lot about git. If I learn enough about git to do this, I will become the thing that I’ve sworn to destroy—someone who counters every complaint about git with “you just have to think of the graph operation you’re trying to achieve”.

  1. Is it a hot take when you’re right? I guess not. 

  2. This would probably be considered a feature to many people, which I suppose is fair enough. 

  3. To be honest, much of this is probably because I forged my git habits back around 2012, and since then a lot of commands have been renamed to make more sense. I’m still doing git checkout -- . to revert unstaged files and it makes absolutely no sense—isn’t checkout for changing branches? 


Helicopter Tracking for Safer Drone Flights

Avid readers will know that I like to fly my drone around the beaches in Sydney. The airspace is fairly heavily trafficked, and so I take the drone rules very seriously. This means no flying in restricted airspace (leading to other solutions for getting photos in these areas), no flying in airport departure or arrival paths, and no flying above the 120m ceiling (or 90m in certain areas). This is easily tracked with a drone safety app (I’m a big fan of ok2fly).

What is more difficult is flying a drone in an area that may have other aircraft nearby. The drone rules state:

If you’re near a helicopter landing site or smaller aerodrome without a control tower, you can fly your drone within 5.5 kilometres. If you become aware of manned aircraft nearby, you must manoeuvre away and land your drone as quickly and safely as possible.

This basically means that if a helicopter turns up, you should get the drone as low as possible and land as quickly as possible. In theory, crewed aircraft should be above 150m (500ft), with a 30m (100ft) vertical gap between them and the highest drones. However on the occasions where there have been helicopters passing by, to my eye they seem to be much closer than that, which makes me anxious—I want my drone to remain well clear of any helicopters.

Virtually all aircraft carry an ADS-B transmitter which broadcasts their GPS location to nearby planes and ground stations. They use this location to avoid running into each other, especially in low-visibility conditions. Flight-tracking services like flightradar24 aggregate this data globally and present it on a map.

My first idea was to write an app that would stream the ADS-B data from a service like flightradar24 for any aircraft in the nearby airspace, and sound an alert if an aircraft was on a trajectory that would intersect with my location. This would be great, but it would be a lot of work, require some kind of API key and agreement from the data provider, and ongoing use would require paying the annual $99USD/$150AUD Apple developer program fee.1

a drone photo of waves coming in to a beach

I realise that I’m a few paragraphs into a post about drone photography and haven’t included a drone photo yet. Here you go.

The next best idea was to setup a Stratux ADS-B receiver using a Raspberry Pi. This would either allow me to pull data from it to my phone (no need to deal with API keys and suchlike) or do all the processing on the Pi (no need to deal with developer restrictions). While this would have been cool, it would have also cost a bit to get all the components, and working out some kind of interface to an otherwise-headless RPi seemed like a frustrating challenge.

After considering these two options for a while I settled on a completely different third option. Instead of building something to alert me in real time, I could just work out which beaches would have nearby aircraft at what times of day, and avoid flying during those times. This is when I came across the OpenSky Network, a network of ADS-B receivers that provides free access to aircraft locations for research purposes. So all I had to do was get the data from Opensky for aircraft in Sydney, and then visualise it to understand the flight patterns around the beaches.

Opensky has a historical API with an SQL-like query interface, as well as a live API with a JSON REST interface. I requested access to the historical data, but was informed that they only provide access to research institutions due to the cost of querying it. So to make do I wrote a simple program that would periodically fetch the positions of aircraft within the Sydney area. This data was then saved to a local SQLite database so I could query it again later. Since the drone rules also forbid flights during the night, I only needed to fetch data during civil daylight hours.

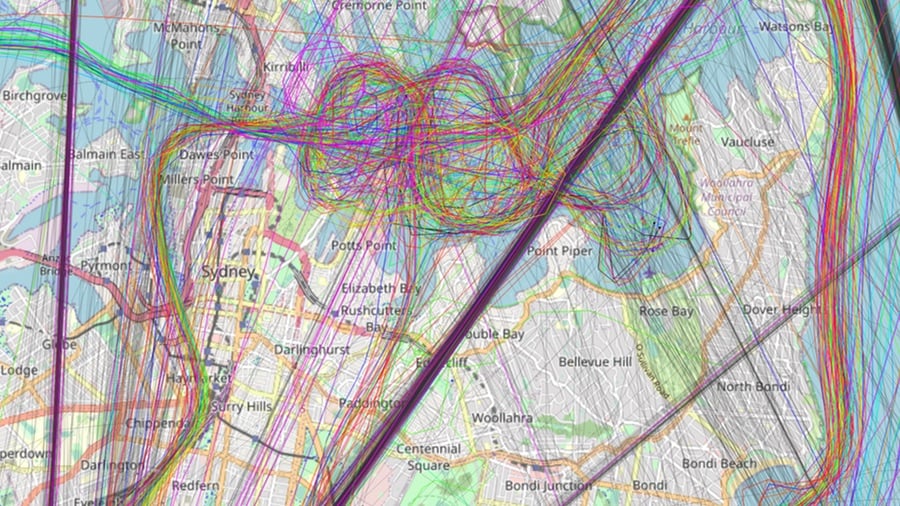
To visualise the data, I used my hackathon-approved map rendering solution: get a screenshot of Open Street Map and naively transform latitude/longitudes to x/y coordinates. After messing up the calculation a bunch, I got a map with a line for every flight, which looked something like this:

map of Sydney Harbour showing many paths taken by aircraft over the harbour

Eventually after staring at this map2 for a long time, I realised that most helicopter (or rotorcraft as they are referred to in the API) routes went from north from the airport, passed along the western side of the city, directly over the Harbour Bridge, did a few loops over the harbour (as seen in the map above), exited the harbour by Watson’s Bay, then turned south and hugged the coastline along the beaches, before finally turning west at Maroubra to get back to the airport.

I finally had the realisation that probably should have been fairly obvious a long time before this—all these helicopters are tourist flights, repeating the same route over and over again. Sure enough if I search for “helicopter sight seeing Sydney” I find the website for a helicopter tour company that does the exact route I saw plastered over my map. Optimistically I emailed them asking how many flights they usually flew in a day, and what time their earliest flight was—this would give me enough information to make a reasonably informed decision about when was best to fly my drone. Sadly they said they couldn’t share this information with me.

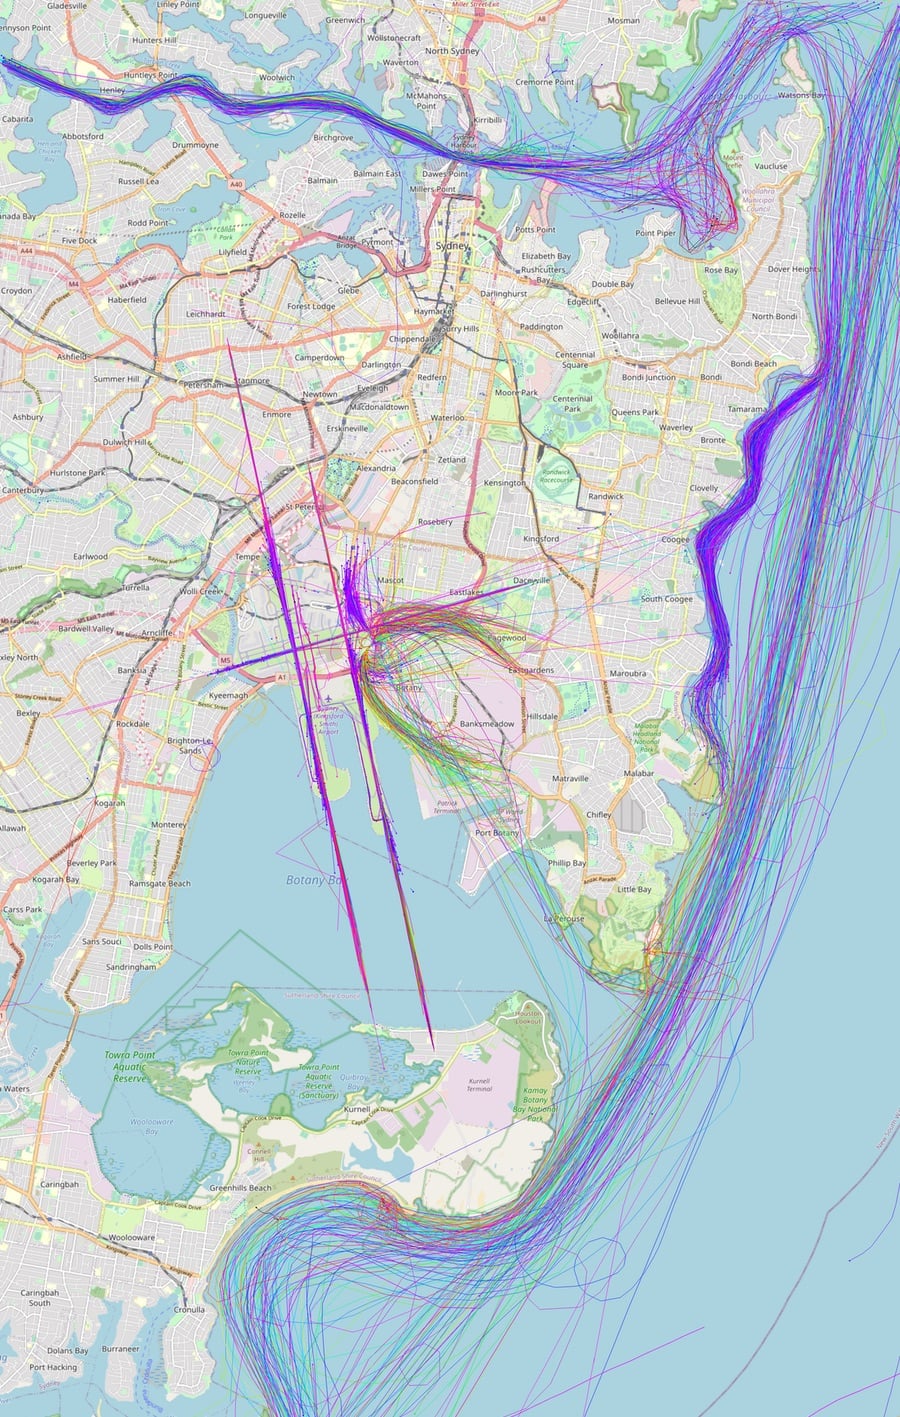
Ok so I would have to do some more data visualisation to work this out for myself. First of all I filtered out any data points that were above 200 metres, since they would be well clear of any drones.

map of Sydney and beaches from the southern head of the harbour down to Cronulla, including Botany Bay

There are some interesting things in this map:

  • The arrival and departure paths for commercial aircraft are very accurate.
  • Helicopters arrive and depart from the eastern part of the airport.
  • Rose Bay is where a lot of seaplanes take off from, so you can see tracks starting and stopping there.
  • By far the densest route is between Bondi and Maroubra, hugging the coast.
  • Planes flying the Victor 1 VFR route are further from the coast.
  • There’s obviously a strict route for aircraft flying over the inner harbour (west of the bridge) creating an aerial highway.

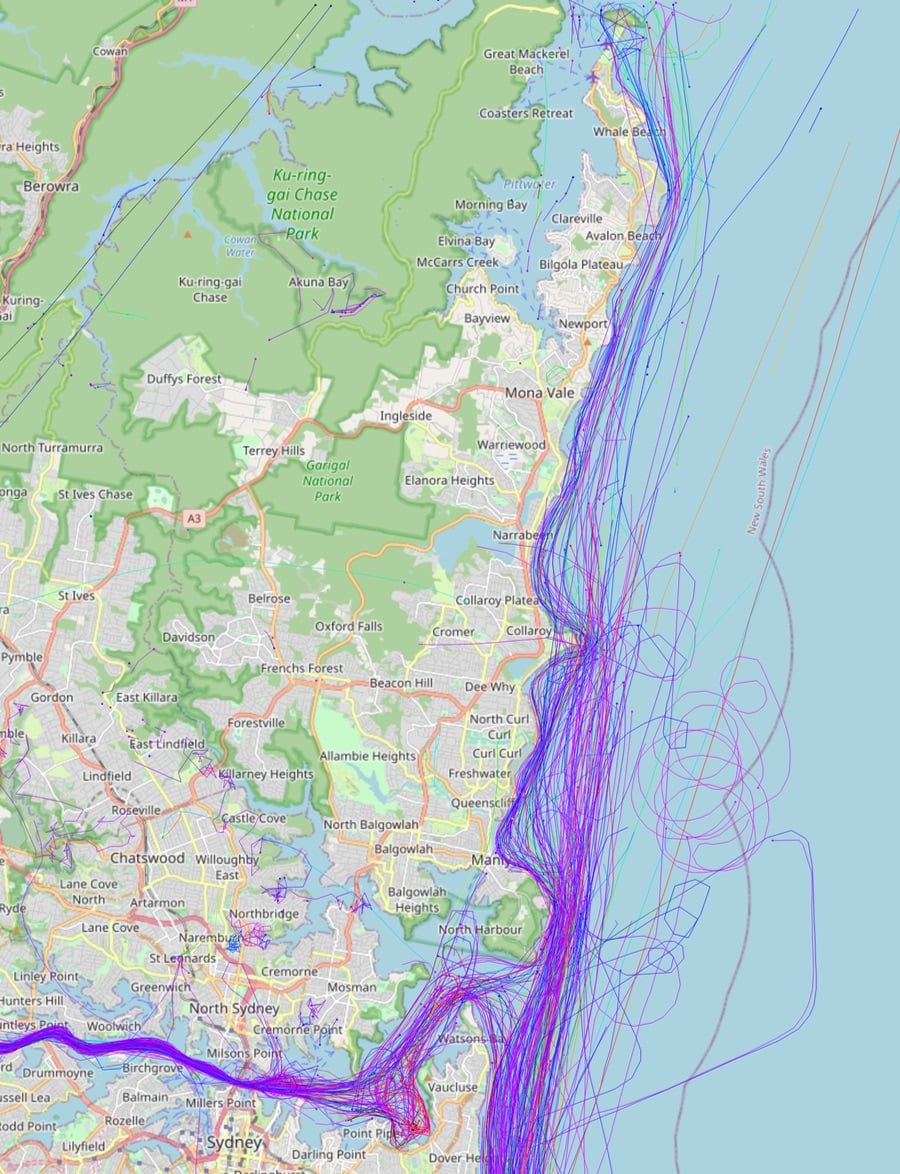
I then compared that with the same view over the northern beaches:

map of Sydney's northern beaches, from the harbour entrance up to Barrenjoey head

It’s worth noting that all the maps contain data for just over one month of flights. There is definitely still a large number of flights going up the coast, but they thin out significantly as you get further north, especially past Long Reef—the headland south of Collaroy beach. I was surprised to see that no aircraft fly over the harbour side of Manly, they instead follow the water out the harbour entrance.

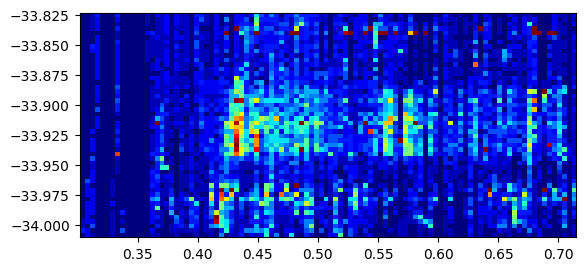
A friend suggested a nice way of visualising the data: plot the time of day on one axis, and the position down the coast on the other, and create a heatmap of the highly-trafficked times/areas. In theory you should be able to see a line for each flight flying down the coast. Sadly my matplotlib skills aren’t that good, so this is the best I could come up with:

histogram of latitude to time in the day

The left axis is the latitude (limited in range from Bondi to Maroubra) and the bottom axis is the fraction of the day (eg 0.5 is midday). Using this we can see that the bulk of flights start at 0.4, which is 9.6 hours into the day, or 9:36 AM. Which makes sense for tourist flights, since passengers presumably have to sign some waivers and do a safety briefing, and they’re not going to want to get out of bed too early. I added the ability on my map to filter out flights past a certain time of day, and sure enough if I only look at flights before 10:00am, the sky is much clearer.

Armed with this new knowledge, I can make some more informed decisions about when to fly my drone around the beaches in Sydney. I’m just not going to bother flying during the middle of the day anywhere between Bondi and Maroubra, if I want to fly there I’ll do it just after sunrise—which will give me better light3 anyway. Flying in the further north beaches is still an option, but I will still want to position myself somewhere with a good view up and down the coast to see other aircraft coming. Since the flight paths are much more predictable than I had expected, if I did make some kind of alerting system, I could simply trigger whenever an aircraft exited the harbour, since their next move is likely to be up or down the coast.

Of course the most important thing—and the lesson I hope you take away from this—is to follow the rules, always check airspace restrictions before flying, be aware of your surroundings, and if in doubt just descend and land as promptly as possible. Don’t use a few map screenshots from someone’s blog as guidance on where to fly your drone.


Map data © OpenStreetMap contributors.

Flight data from OpenSky:

Bringing up OpenSky: A large-scale ADS-B sensor network for research Matthias Schäfer, Martin Strohmeier, Vincent Lenders, Ivan Martinovic, Matthias Wilhelm ACM/IEEE International Conference on Information Processing in Sensor Networks, April 2014

  1. I could install it on my phone with a free developer account, but that requires re-installing the app from Xcode every week. 

  2. Well not this map, the full-size map with way more lines on it. 

  3. Although it will give me worse sleep. 


Simple Home Server Monitoring with Prometheus in Podman

The next step in my containerising journey is setting up Prometheus monitoring. I’m not going to use this for alerts or anything fancy yet, just to collect data and see what the load and health of my server is and be able to track trends over time. In doing this I wanted:

  • I don’t want to edit a central YAML file when I start a new service
  • Key container metrics (CPU/memory/etc) should be monitored automatically
  • Prometheus itself should run in a container

There are plenty of existing posts on setting up Prometheus in a container, so I’ll keep this short. I used pod to configure the containers:

containers:
  prometheus:
    name: prometheus
    image: docker.io/prom/prometheus:latest
    network: prometheus
    volumes:
      prometheus_data: /prometheus
    bind_mounts:
      ./prometheus.yaml: /etc/prometheus/prometheus.yml
    ports:
      9090: 9090
    labels:
      prometheus.target: prometheus:9090

  podman-exporter:
    name: podman-exporter
    image: quay.io/navidys/prometheus-podman-exporter:latest
    bind_mounts:
      /run/user/1000/podman/podman.sock: /var/run/podman/podman.sock,ro
    environment:
      CONTAINER_HOST: unix:///var/run/podman/podman.sock
    run_flags:
      userns: keep-id
    network: prometheus
    labels:
      prometheus.target: podman-exporter:9882

  speedtest:
    name: prometheus_speedtest
    image: docker.io/jraviles/prometheus_speedtest:latest
    network: prometheus
    labels:
      prometheus.target: prometheus_speedtest:9516
      prometheus.labels:
        __scrape_interval__: 30m
        __scrape_timeout__: 2m
        __metrics_path__: /probe

prometheus contains the actual Prometheus application, which has its data stored in a volume. podman-exporter exports Podman container metrics, accessed by mounting in the Podman socket.1 speedtest isn’t essential, but I was curious to see whether I had any variations in my home internet speed, and running one more container wasn’t difficult. This also forced me to work out how to customise the scraping of jobs configured via Prometheus HTTP service discovery.

To meet my first requirement of having no global config, I needed to setup some kind of automatic service discovery system. Prometheus supports fetching targets via an HTTP API—all you have to do is return back a list of jobs to scrape in a basic JSON format. Since I already run a container that shows a status page for my containers (more on that another time, perhaps) I have an easy place to add this endpoint. You just need to add the endpoint into your prometheus.yaml config file once:

scrape_configs:
  - job_name: endash
    http_sd_configs:
    - url: http://my_status_page:1234/http_sd_endpoint

That endpoint returns some JSON that looks like this:

[
  {
    "targets": ["prometheus:9090"],
    "labels": {
      "host": "Steve",
      "job": "prometheus",
      "container_id": "4a98073041d6b"
    }
  },
  {
    "targets": ["prometheus_speedtest:9516"],
    "labels": {
      "host": "Steve",
      "job": "prometheus_speedtest",
      "container_id": "db95c10b425cc",
      "__scrape_interval__": "30m",
      "__scrape_timeout__": "2m",
      "__metrics_path__": "/probe"
    }
  }
]

targets is a list of instances to scrape for a particular job (each container is one job, so only one target in the list). labels defines additional labels added to those jobs. You can use this to override the job name (otherwise it’ll unhelpfully be the name of the HTTP SD config, in my case endash) and set some of the scrape config values, if the target should be scraped on a different schedule.

My status dashboard has an endpoint that will look at all running containers and return an SD response based on the container labels. This allows me to define the monitoring config in the same place I define the container itself, rather than in some centralised Prometheus config. You can see in my pods.yaml file (above) that I use prometheus.target and prometheus.labels to make a container known to Prometheus as a job.

The thing that really makes this all work is Podman networks. The easiest way to get Prometheus running is to run it on the host network, so that it doesn’t run in its own containerised network namespace. So when it scrapes some port on localhost that’s the host localhost, not the container localhost. This works reasonably well if all your containers publish a port on the host. This is definitely an acceptable way of setting things up, but I wanted to be able to run containers without published ports and still monitor them.

You can do this by creating a Podman network and attaching any monitor-able containers to it, so that they are accessible via their container names:

> podman network create prometheus
> podman run -d --network prometheus --name network-test alpine:latest top
> podman run -it --network prometheus alpine:latest
$ ping network-test
PING network-test (10.89.0.16): 56 data bytes
64 bytes from 10.89.0.16: seq=0 ttl=42 time=0.135 ms
64 bytes from 10.89.0.16: seq=1 ttl=42 time=0.095 ms
...

I’m running top in the network-test container just to keep it running in the background for this example. If you ran a shell, it would exit immediately since there is no input connected.

The one wrinkle of using a Podman network is that it makes accessing non-container jobs more difficult. I wanted to setup node_exporter to keep track of system-level metrics, and it can’t run in a container as it needs full system access (or at least, it doesn’t make sense to run in a container). Thankfully this ended up being super easy, I can just install node_exporter via apt:

$ sudo apt install prometheus-node-exporter

Which will automatically start a service running in the background and serving metrics on localhost:9100/metrics. To access this from our Prometheus container, you can just use the magic hostname host.containers.internal, which resolves to the current host. For example:

> podman run -it alpine:latest
$ ask add curl
$ curl host.containers.internal:9100/metrics
... a whole bunch of metrics

So I have to add one static config into my prometheus.yaml file:

scrape_configs:
  - job_name: steve
    static_configs:
      - targets: ['host.containers.internal:9100']

So now I’ve got a fully containerised, automatic monitoring system for anything running on my home server. Any new containers will get picked up by podman-exporter, and get their resource usage recorded automatically. If I integrate a Prometheus client library and export metrics, then I can just add monitoring config to the pods.yaml file for that project, and have my service discovery system pick it up and have it scraped automatically.

I’ve added a lot of functionality to pod since I first wrote about it, I’m aiming to get it cleaned up and documented better soon.

  1. This obviously gives the exporter full access to do anything to any container, so you’ve just kinda got to trust it’s doing the right thing. 


Limited Languages Foster Obtuse APIs

On the topic of the design decisions of a low-level system limiting the design space of things built on top of them, the design of programming languages has a significant impact on the APIs and software built using them.

Go is heralded by the likes of Hacker News and r/programming as modern, exciting, and definitely not anything like Java, which is old and boring. Java developers spend their days writing abstract factory interfaces and generic strategy builders, whereas Go developers spend their time solving Real Problems™. Although if you squint a bit, you can see the similarities between Go and Java, and perhaps see where Go developers might end up.

Let’s think about factories. I’d include a quote from Effective Java here, but I don’t have a copy handy. The tl;dr is that you use a factory so that you’re free from the limitations of object construction in Java. When you call new MyThing(), you can only get one of two things; an exception, or a new instance of MyThing. If you call a static method like MyThing.create(), then you can get absolutely anything. Of course, good taste would prevent us from returning anything, but we can do things like cache expensive objects, or return a different MyThing subclass.

A concrete example (I know some people like that kind of thing) would be the main interface to an RPC framework1. Connection.create(String url) could return a different implementation based on the protocol of the URL passed in (TCP, HTTP, Unix socket, in-memory, etc). The normal constructor syntax can’t do this, so you end up with a recommendation for developers to prefer static constructor-methods in case of future flexibility.

Go has this exact same limitation. Struct creation is a different and special type of syntax. It can only do one thing—create a new instance of a struct (it can’t even throw an exception because Go doesn’t have those). This leads to the recommendation for packages to have a function that creates the instance for you:

func MakeMyThing(a string, b int) MyThing {
  return MyThing{a: a, b: b}
}

Does this look familiar?

Struct initialisation in Go also has a surprising feature: it will silently set any attributes to their default value if the attribute is omitted from the list. So this code compiles without any warnings:

type MyThing struct {
  foo string
  bar string
}

func main() {
  fmt.Println(MyThing{foo: "hello"})
}

And bar will silently be set to "" (the default value for a string). If you want to have any guarantee that attributes will all be set correctly, or be able to add an attribute to a struct and know that all usages have it set, you should wrap the creation of the struct in a factory function.

The other limiting factor for Java is the handful of types that have special syntax in the language. Only the builtin number types, strings, and arrays can use operators and the subscript syntax, there is no mechanism for these to be used on any user-defined type. So if you have a method that returns some data as a byte[] (for performance or convenience or whatever), and you want to change it to be MyByteSequence, you have to change all subscripts over to be a method call, since you define that operator on MyByteSequence.

Go has the exact same limitation; only number types, strings, slices, and maps use the operator and subscript syntax. In both cases this means that if you want to build an abstraction over the underlying data, you need to wrap them in a struct/object and define functions/methods on that object.

Prior to generics being added to Go, there was even more limited ability to build abstractions on top of the built-in types.

The effect of this is that you end up with a bunch of code that is entirely composed of method or function calls. Which doesn’t seem like much of a problem on the surface, but you end up in a state where every operation looks the same, making it hard to see the “shape” of what the code is doing.

This is the exact problem that keeps me from enjoying Lisp (and oh boy have I tried to enjoy Lisp). When I look at any non-trivial piece of Lisp code, I have a lot of trouble working out what is actually happening because every action has equal precedence—literally. Clojure does a commendable job at improving this by adding TWO additional types of brackets that allow for some glanceable differentiation.

; the square brackets make it easier to find the
; function arguments
(defn my-method [foo bar]
  ; the curly brackets allow for defining different
  ; types of commonly-used literals, like a map
  {:foo foo
   :bar bar})

Java code ends up devolving towards a similar type of syntax, since the only part of the syntax that you get “access” to is method calls. I used an example earlier in the context of Crystal about using time APIs in Java:

// This Java code
Duration.ofHours(4).plus(Duration.ofMinutes(5))
// Is surprisingly similar to Clojure
(.plus (Duration.ofHours 4) (Duration.ofMinutes 5))

I think one of the reasons that I find Elixir easier to read than Clojure is that it has much more syntax, so different actions actually look different. In Clojure, a case statement looks just the same as a method call, whereas in Elixir the addition of an infix -> operator to separate the match from the code makes the code block much easier to read.

Now, if you’re a particular type of person who solves every problem with a profiler and a flame graph, you’re probably preparing an argument about how overriding operators and subscripts allows for hiding potentially expensive operations. If developers are discouraged from using the built-in types that support these operators, then your expensive operations are just hidden behind a method call. Every Java 101 class tells you never to use an array, instead use List<>. Who knows how .get() is implemented in that list? It could be a linked list, and each call could be an O(n) operation. Would it really be much worse if that was behind a subscript instead of a method?

Unless you’re using some capabilities-based language where you can limit the type of operations a module can do, any function call could result in a network request or slow inter-process communication. It could even just do some blocking I/O, wasting valuable time that your thread could spend doing something more interesting.

Limiting language features for the sake of performance issues is ignoring what actually causes performance issues: slow code. Slow code can be called from anywhere, and limiting the expressiveness of the language seems like a high cost when you’re going to have to find your bottlenecks using a profiler anyway.

Of course no blog post about languages would be complete without me explaining how Crystal is perfect. There are virtually no special operators in Crystal. Operators are implemented as methods on the left-hand operand, subscripts are just a special method called []. The exception is that the array shorthand is linked to the built-in Array type, so [] of String is equivalent to Array(String).new.2

What this really boils down to is that programming language design should limit the amount of syntax that are bound to specific types. In Java this is operators and subscripts, in Go this is also includes channels. The Java ecosystem’s obsession with design patterns and abstraction is fuelled by the lack features in the language, requiring developers to invent another sub-language on top using the pieces of Java that they have access to—types and method calls. Go might have different built-in tools (like coroutines and channels) but since they are baked right into the language syntax, they can’t be replaced or altered as developer needs change.

  1. This is like, my favourite thing. 

  2. There are actually variations of this syntax that other types can override. 


Why Modernising Shells is a Sisyphean Effort

Anyone that knows me is probably aware that I spend a lot of time in the terminal. One of the many things that I have wasted time learning is the various oddities of shell scripting, and so I am cursed with the knowledge of the tradeoffs in their design. It seems to be something that most people don’t appreciate. Your shell has to find a balance between getting out of your way for interactive use, and being the best way to link together multiple unrelated programs to do something useful. The Unix philosophy of having many small tools, each dedicated to one simple job means that you can more easily replace one with an alternative, or a new tool doesn’t have to reinvent the wheel before it can be useful.

The problem is that to most people, the shell is completely inscrutable. Even experienced programmers who have no problem juggling many other programming languages will get into a muddle with even a simple shell script. To be honest, you can’t really blame them. Shell languages are full of bizarre syntax and subtle traps.

The root of the problem is POSIX; it defines the API for most Unix (and Unix-like, e.g: Linux) operating systems. Most important is the process model. A POSIX process receives arguments as an array of strings, input as a stream of bytes, and can produce two streams of output (standard output and error). Unless you’re going to redesign the whole operating system1, you’ve got to work within this system.

POSIX does also define the syntax for the shell language, which is why Bash, ZSH, and other shells all work in a similar way. Fish, xonsh, nushell, and Oil are not entirely POSIX compatible, and so are free to alter their syntax.

What sets a shell apart from other languages is that external programs are first-class citizens2, you don’t have to do anything special to launch them. If you type git status the shell will go off and find the git program, and then launch it with a single argument status. If you were to do this in Ruby, you’d have to do system('git', 'status')—more fiddly typing, and completely different from calling a function.

So if you want programs to fit in just the same as shell functions, your functions need to work like POSIX processes. This means they can’t return something—just input and output streams—and their arguments must be handled as strings. This makes implementing a scripting language that can be compared to Ruby or Python basically impossible. The constraints of having all your functions act like processes hampers your ability to make useful APIs.

This makes it really difficult for your shell language to support any kind of strong typing—since everything passed to any command or function needs to be a string, you’re constantly reinterpreting data and risking it being reinterpreted differently. Having everything be handled like a string is consistent with how programs run (they have to work out how to interpret the type of their arguments) is a constant source of bugs in shell scripts.

My favourite fun fact about shells is that some of the “syntax” is actually just a clever use of the command calling convention. For example, the square bracket in conditionals is actually a program called [.

xonsh is a new shell that merges Python and traditional shell syntax, except it does it by trying to parse the input as a Python expression, and if that doesn’t make sense it assumes it should be in shell mode. This gets scripting and interactive use tantalisingly close, except it seems to me (without having used xonsh) that it would end up being unpredictable, and you would have to always be aware of the fact you’re straddling two different modes at all times.

nushell attempts to solve the problem in a different direction. It requires you to either prefix your command with an escape character or write an external command definition to have it be callable from the shell. This moves away from the typical design of shells, and relegates external programs to be second-class citizens. nu is really a shell in search of a new operating system—to really make the most of their structured-data-driven approach, you’d want a new process model that allowed programs to receive and emit structured data, so that all the features for handling that in the shell could be used on arbitrary programs without writing an external command definition first.

So if we’re too snobby to resort to parser tricks or fancy wrappers, what are we left with? Well we’ve got some serious constraints. The input space for command arguments is every single letter, number, and symbol. Any use of a special character for syntax makes it potentially harder for people to pass that character to commands, for example if + and - were used as maths operators, you’d need to quote every flag you passed: git add "--all" instead of git add --all, since the dashes would be interpreted as different syntax.

You’ve probably already come across this using curl to download a URL with query parameters:

$ curl https://willhbr.net/archive/?foo=bar
zsh: no matches found: https://willhbr.net/archive/?foo=bar
$ curl 'https://willhbr.net/archive/?foo=bar'
# ...

Since ? is treated specially in most shells to do filename matches, you have to wrap any string that uses it in quotes. Since so many people are used to dumping arbitrary strings unquoted as command-line arguments, you don’t want to restrict this too much and force people to carefully quote every argument. It’s easy to start an escaping landslide where you keep doubling the number of escape characters needed to get through each level of interpolation.

oil is the most promising next-generation shell, in my opinion. From a purist perspective, it does treat functions and commands slightly differently, as far as I can see. This does look like it’s done in a very well thought out way, where certain contexts appear to take an expression instead of a command. This is best understood by reading this post on the Oil blog.

# the condition is an expression, not a command so it can have operators
# and variables without a `$` prefix.
if (x > 0) {
  echo "$x is positive"
}
# you can still run commands inside the condition
if /usr/bin/false {
  echo 'that is false'
}

Once you’ve split the capabilities of functions and commands, you might as well add a whole set of string-processing builtin functions that make grep, sed, cut, awk and friends unnecessary. Being able to trivially run a code block on any line that matches a regex would be excellent. Or being able to use code to specify a string substitution, rather than just a regex.3

There’s also a third dimension for any shell, and that’s how well it works as an actual interface to type things into. The syntax of the Oil ysh shell is better than ZSH, but in ZSH I can customise the prompt from hundreds of existing examples, I can use Vim keybindings to edit my command, I have syntax highlighting, I have integration with tools like fzf to find previous commands, and I have hundreds of lines of existing shell functions that help me get things done. And to top it all off, I can install ZSH on any machine from official package sources. Right now, it’s not worth it for me to switch over and lose these benefits.

  1. Which doesn’t seem to be something many people are interested in; we’re pretty invested in this Linux thing at this point. 

  2. Except for modifying variables and the environment of the shell process. 

  3. I know I can probably somehow do all this with awk. I know that anything is possible in awk. There are some lines I will not cross, and learning awk is one of them. 


Picking a Synology

One of the key characteristics you want from a backup system is reliability. You want to minimise the number of things that can fail, and reduce the impact of each failure for when they do happen. These are not characteristics that would be used to describe my original backup system:

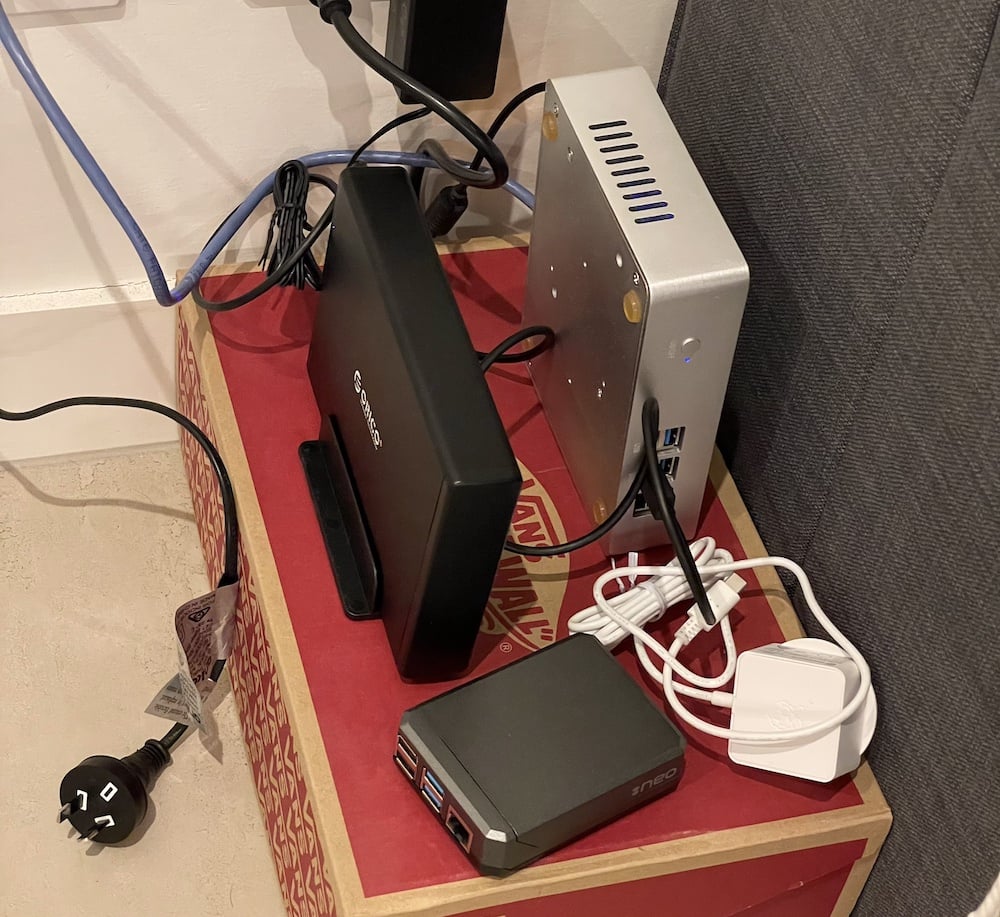
a small computer sitting on a shoebox with an external HDD next to it, surrounded by a nest of cables

The first iteration of my backup system, running on my Scooter Computer via an external hard drive enclosure.

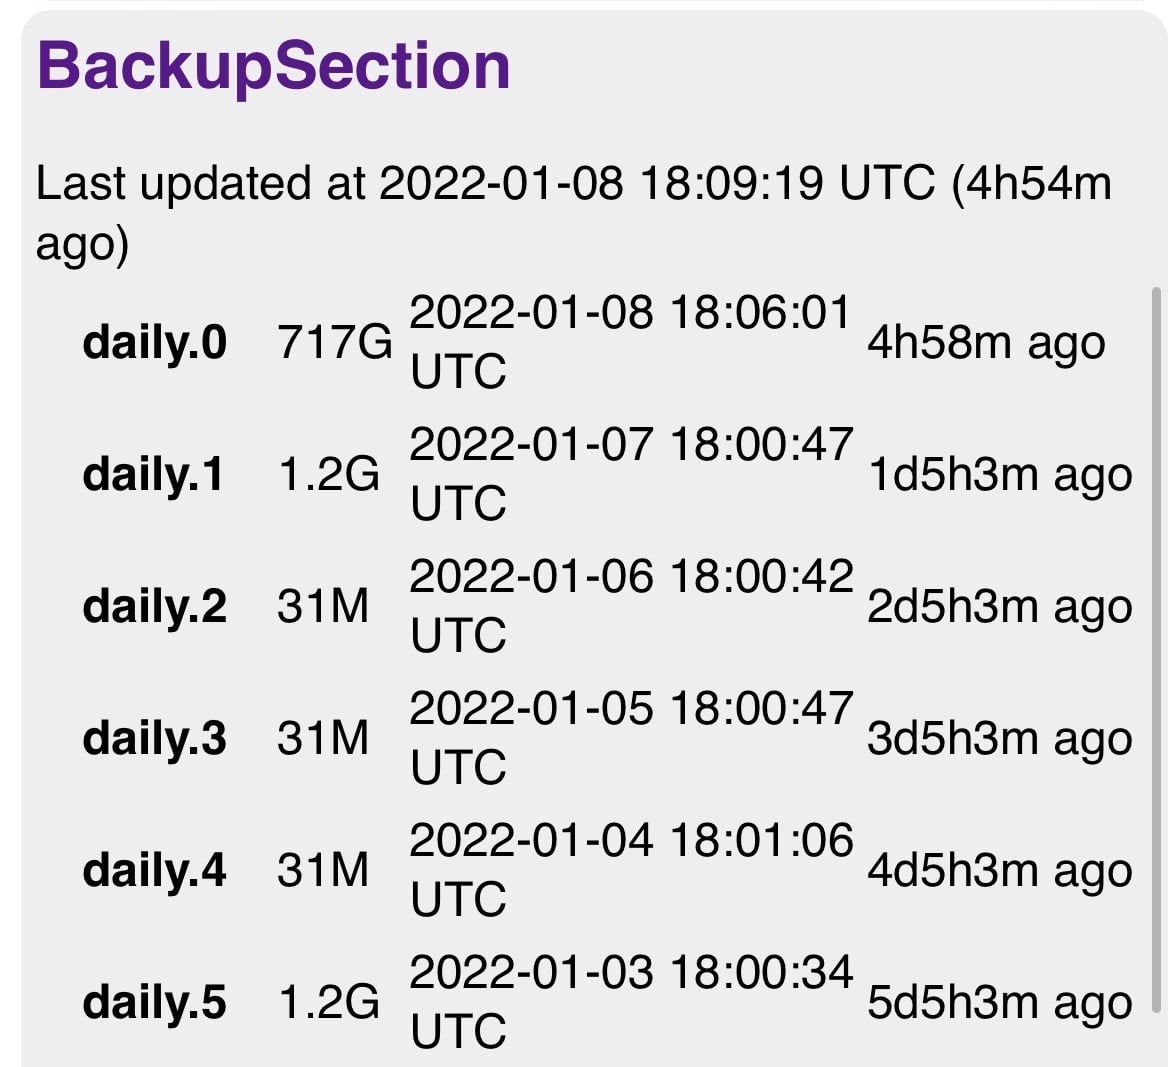
This setup pictured above evolved into a Raspberry Pi (featured unused in the bottom of that photo) with two external 4T hard drives connected to it. All my devices would back themselves up to one of the drives, and then rsnapshot would copy the contents of one drive across to the other, giving me the ability to look back at my data from a particular day. The cherry on top was a wee program1 that ran an HTTP server with a status page, showing the state of my backups:

screenshot of a webpage with a list of backup times in a table

My custom backup status page that told me whether I was still snapshotting my data or not.

Naturally, this system was incredibly reliable and never broke,2 but I decided to migrate it to a dedicated NAS device anyway. Synology is the obvious choice, they’ve got a wide range of devices, and a long track record of making decent reliable hardware.

With the amount of data that I’m working with (<4T) I could absolutely have gone with a 1-bay model. However this leaves no room for redundancy in case one disk fails, no room for expansion, and I already had two disks to donate to the cause. Two bays would have been a sensible choice, it would have allowed me to use both my existing disks and have redundancy if one failed. But it would have limited expansion, and once you’re going two bays you might as well go four… right? If I’m buying something to use for many years, having the ability to expand up to 64T of raw storage capacity is reassuring.

At the time that I was researching, Synology had three different four-bay models that I was interested in: the DS420+, DS418, and DS420j.

The DS420+ is the highest end model that doesn’t support additional drive expansion (there are some DS9xx+ models that have 4 internal bays and then allow you to expand more with eSATA). It runs an x86 chip, supports Btrfs, allows for NVMe flash cache, and can run Docker containers. It has hot-swappable drive bays and was released in 2020 (that’s the -20 suffix on the model name3).

The DS418 is the “value” model, it’s basically just the one they made in 2018 and kept around. It also runs an x86 chip, supports Btrfs, and can run Docker containers. It uses the same basic chassis as the DS420+, so also has hot-swappable drives.

The DS420j is the low-cost entry model, running a low-end ARM chip, no Btrfs support, no Docker, and a cheaper chassis with no hot-swappable drives.

Btrfs is a copy-on-write filesystem that never overwrites partial data. Each time part of a block is written, the whole block is re-written out to an unused part of the disk. This gives it the excellent feature of near-free snapshots. You can record some metadata of which blocks were used (or even just which blocks to use for the filesystem metadata) and with that you get a view into the exact state of the disk at that point in time, without having to store a second copy of the data. Using Btrfs would replace my existing use of rsnapshot, moving that feature from a userspace application to the filesystem.

This had initially pointed me towards the DS420+ or DS418. My concern with the 418 was the fact that it was already over 4 years old. I didn’t want to buy a device that was bordering on halfway though its useful lifespan (before OS updates and other software support stopped). The cost of the DS418 was only a little bit less than the DS420+, so if I was going to spend DS418 money, I might as well be getting the DS420+.

The other feature of the DS418 and DS420+ was Docker support—you can run applications (or scripts) inside containers, instead of in the cursed Synology Linux environment. I wasn’t planning on running anything significant on the Synology itself, it was going to be used just for backup and archival storage. Anything that required compute power would run on my home server.

Eventually I decided that the advantages of Btrfs and Docker support were not enough to justify the ~$300 price premium when compared to the DS420j. I already knew and trusted rsnapshot to do the right thing, and I could put that money towards some additional storage. The DS420j is a more recent model, and gives me the most important feature, which is additional storage with minimal hassle.

I’ve had the DS420j for about three months now, it’s been running almost constantly the entire time, and my backup system has moved over to it entirely.

The first thing I realised when setting up the DS420j is despite the OS being Linux based, it does not embrace Linux conventions. Critically it eschews the Linux permission model entirely and implements its own permissions, so every file has to be 777—world read and writable—for the Synology bits to work. This has knock-on effects to the SSH, SFTP, and rsync features; any user that has access to these has access to the entire drive. Since I’m the only user on the Synology, I’m not that bothered by this. The only reason I’d want different users is to have guarantees that different device backups couldn’t overwrite each other.

The best thing by far with the Synology is how much stuff is built in or available in the software centre. Setting up Tailscale connectivity, archives from cloud storage (eg Dropbox), and storage usage analysis was trivial.

The most difficult thing about moving to the Synology was working out how to actually move my data over. Archives of various bits were scattered across external hard drives, my laptop, and my RPi backup system. Since I was using the disks from the RPi in the Synology, I had to carefully sequence moving copies of between different disks as I added drives to the Synology (since it has to wipe the drive before it can be used).

During the migration having USB 3 ports on the NAS was excellent, with the RPi I’d be forced to copy things from over the network using another computer, but now I can just plug directly in and transfer in much less time. An unexpected benefit was that I could use an SD card reader to dump video from GoPros directly onto the Synology (since I knew I wasn’t going to get around to editing it). This will probably come in handy if I want to actually pull anything off the Synology.

At the moment I’m using 4.1T of storage (most of that is snapshots of my backups). According to the SHR Calculator I can add two more 4T drives (replacing my 2T drive) to get 12T of usable space, or two 8T drives to get 16T. Since my photo library grows at about 400G per year, I think my expansion space in the DS420j will be sufficient for a long time.4

  1. The program was written in Crystal, and those in the know will be aware just how painful cross-compilation to ARM is! 

  2. It actually only broke once when one of the disks failed to mount of all my data was spewed onto the mount point on the SD card, filling up the filesystem and grinding the whole thing to a halt. 

  3. Can you really trust your backups to a company that has a naming scheme that is going to break in a mere 77 years? 

  4. Until I get a Sony a7RV and the size of my raw photos almost triples. 


Why Crystal is the Best Language Ever

Crystal is a statically typed language with the syntax of a dynamically typed one. I first used Crystal in 2016—about version 0.20.0 or so. The type of projects I usually work on in my spare time are things like pod, or my server that posts photos to my photos website.

Type System

This is the main selling point of Crystal, you can write code that looks dynamically typed but it’ll actually get fully type checked. The reality of this is that if I know the type and the method is part of a public interface (for me that’s usually just a method that I’m going to be calling from another file), I’ll put a type annotation there. That way I usually only have to chase down type errors in single files. If I’m extracting out a helper method, I won’t bother with types. You can see this in the code that I write:

private def calculate_update(config, container, remote) : ContainerUpdate
  ...

The three argument types are fairly obvious to anyone reading the code, and since the method is private the types are already constrained by the public method that uses this helper. If I wrote this in Java it would look something like:

private ContainerUpdate calculateUpdate(
  Config config, Container container, Optional<String> remote) {
  ...

There’s a spectrum between language type flexibility and language type safety. Dynamic languages are incredibly flexible, you can pass an object that just behaves like a different object and everything will probably work. The language gets out of your way—you don’t have to spend any time doing work explain to the compiler how things fit together—it’ll just run until something doesn’t work and then fail. Languages that boast incredible type safety (like Rust) require you to do a bunch of busywork so that they know the exact structure and capabilities of every piece of data before they’ll do anything with it. Crystal tries to bend this spectrum into a horseshoe and basically ends up with “static duck typing”—if it’s duck shaped at compile time, it will probably be able to quack at runtime.

It definitely takes some getting used to. The flow that I have settled on is writing code with the types that I know, and then seeing if the compiler can work everything out from there. Usually I’ll have made a few boring mistakes (something can be nil where I didn’t expect, for example), and I’ll either be able to work out where the source of the confusing type is, or I can just add some annotations through the call stack. Doing this puts a line in the sand of where the types can vary, making it easy to see where the type mismatch is introduced.

The Crystal compiler error trace can be really daunting, since it spits out a huge trace of the entire call stack of where the argument is first passed to a function all the way to where it is used in a way it shouldn’t be. However once you learn to scroll a bit, it’s not any harder than debugging a NoMethodError in Ruby. At the top of the stack you’ve got the method call that doesn’t work, each layer of the stack is somewhere that the type is being inferred at.

This can get confusing as you get more layers of indirection—like the result of a method call from an argument being the wrong type to pass into a later function—but I don’t think this is any more confusing than the wrong-type failures that you can get in dynamic languages. Plus it’s happening before you even have to run the code.

A downside of Crystal’s type system is that the type inference is somewhat load-bearing. You can’t express the restrictions that the type system will make from omitting type annotations, the generics are not expressive enough. So very occasionally the answer to fixing a type error is to remove a type annotation and have the compiler work it out.

Standard Library

This is probably the thing that keeps me locked in to using Crystal. Since I’m reasonably familiar with the Ruby standard library, I was right at home using the Crystal standard library from day one. As well as being familiar, it’s also just really good.

Rust—by design I’m pretty sure—has a very limited standard library, so a lot of the common things that I’d want to do (HTTP client and server, data serialisation, for example) require third-party libraries. Since Crystal has a more “batteries included” standard library, it’s easier for my small projects to get off the ground without me having to find the right combinations of libraries to do everything I want.

API design is hard, and designing a language’s standard library is especially difficult, since you want to leave room for other applications or libraries to extend the existing functionality, or for the standard library types to work as an intermediary between multiple libraries that don’t have to be specifically integrated together. This is where I really appreciate the HTTP server and I/O APIs. The HTTP server in the standard library is really robust, but the HTTP::Handler abstraction means that you can fairly easily replace the server with another implementation, or libraries can provide their own handlers that plug into the existing HTTP::Server class.

The IO API is especially refreshing given how hard it is to read a file in Swift. It’s a great example of making the easy thing easy, but then making the more correct thing both not wildly different, or much harder.

# Reading a file as a String is so easy:
contents = File.read(path)
# do something with contents
# And doing the more correct thing is just one change away:
File.open(path) do |file|
  # stream the file in and do something with it
end

And then since all input and output use the same IO interface, it’s just as easy to read from a File as it is to read from a TCPSocket.

There is definitely a broader theme here; Crystal is designed with the understanding that getting developers to write 100% perfect code 100% of the time is not a good goal. You’re going to want to prototype and you’re going to want to hack, and if you’re forced to make your prototype fully production-ready from the get-go, you’ll just end up wasting time fighting with your tools.

Scaling

I wrote back in 20171 thinking about how well different languages scaled from being used for a small script to being used for a large application. At this point I was still hoping that Swift would become the perfect language that I hoped it could be, but over five years later that hasn’t quite happened.

The design of Crystal sadly almost guarantees that it cannot succeed in being used by large teams on a huge codebase. Monkey-patching, macros, a lack of isolated modules, and compile times make it a poor choice for more than a small team.

Although I remain hopeful that in 10 years developers will have realised that repeatedly writing out type annotations is a waste of time, and perhaps we’ll have some kind of hybrid approach. What about only type annotations for public methods—private methods are free game? Or enforce that with a pre-merge check, so that developers are free to hack around in the code as they’re making a feature, and then baton down their types when the code is production ready.

Flexibility

I’m of the opinion that no piece of syntax should be tied in to a specific type in the language. In Java, the only things that can be subscripted are arrays—despite everyone learning at university that you should always use List instead. This limits how much a new type can integrate into the language—everything in Java basically just ends up being a method call, even if an existing piece of syntax (like subscript, property access, operator, etc) would be neater.

Pretty much everything in Crystal is implemented as a special method:

struct MyType
  def [](key)
    ...
  end

  def property=(value)
    ...
  end
end

There’s no special types that have access to dedicated syntax (except maybe nil but that is somewhat special), so you can write a replacement for Array and have it look just like the builtin class. Being able to override operators and add methods to existing classes allows things like 4.hours + 5.minutes which will give you a Time::Span of 4:05. If you did this in Java2 you’d have something like this, which absolutely does not spark joy:

Duration.ofHours(4).plus(Duration.ofMinutes(5))

Safety

While Crystal’s type system is game-changing, it doesn’t break the status quo in other ways. It has no (im)mutability guarantees, and has no data ownership semantics. I think this is down the design goal of “Ruby, but fast and type checked”. Ruby has neither of those features, and so nor does Crystal.

An interesting thought is what would a future language look like if it tried to do what Crystal has done to type checking to data ownership. The state of the art in this area seems to be Rust and Pony, although it seems like these are not easy to use or understand (based on how many people ask about why the borrow checker is complaining on Stackoverflow). A hypothetical new language could have reference capabilities like Pony does, but have them be inferred from how the data is used.

Macros

Every language needs macros. Even Swift (on a rampage to add every language feature under the sun) is adding them. Being able to generate boring boilerplate means developers can spend less time writing boring boilerplate, and reduces the chance that a developer makes a mistake writing boring boilerplate because they were bored. If my compiled language can’t auto-implement serialisation in different formats (JSON, YAML, MessagePack) then what’s even the point of having a compiler?

It’s a shame that Crystal’s macros are a bit… weird. The macro language is not quite the full Crystal language, and you’re basically just generating text that is fed back into the compiler (rather than generating a syntax tree). Crystal macros are absolutely weak-sauce compared to macros in Lisp or Elixir—but those languages have the advantage of a more limited syntax (especially in the case of Lisp) which does make their job easier.

Crystal macros require a fairly good understanding of how to hack the type system to get what you want. I have often found that the naive approach to a macro would be completely impossible—or at least impractical—but if you flipped the approach (usually by leveraging macro hooks) you can leverage the flexible type system to produce working code.

The current macros are good enough to fit the use cases that I usually have, and further improvements would definitely be in the realm of “quality of life” or “academically interesting”. You can always just fall back to running an external program in your macro, which gives you the freedom to do whatever you want.

The Bottom Line

Back in my uni days there would be a new language each week that I was convinced was the future—notable entries include Clojure, Elixir, Haskell, Kotlin, and Go. There are aspects to all these languages that I still like, but each of them have some fairly significant drawback that keeps me from using them3. At the end of the day, when I create a new project it’s always in Crystal.

Other languages are interesting, but I’m yet to see something that will improve my experience working on my own small projects. Writing out interface definitions to appease a compiler sounds just as unappealing as having my program crash at runtime due to a simple mistake.

  1. I’d only dabbled in Crystal for less than a year at this point, and was yet to realise that it was the best language ever. 

  2. After researching for hours which library was the correct one to use. 

  3. Really slow edit/build/run cycle, process-oriented model gets in the way for simple projects, I just don’t think I’m a monad type of guy, experience developing outside of an IDE is bad, lacking basic language features. 


Interfaces of Spatial Photo Editing

How would you import, edit, and export photos using an AR/VR headset? I personally think there is a lot of potential for this to be an exceptional experience, far better than working on a laptop, especially in sub-optimal working conditions. I also think the jump from hand to face is a significant hurdle that you might not want to dive head-first into—I’ve relegated a lot of that to the footnotes.1

As with everyone else, I have been inundated with people’s thoughts on spatial computing. The assumptions that I’ve made here are largely based on information from:2

Let’s cast our mind into the not-too-far future, let’s say about five or six years from now. Spatial computing devices (AR/VR headsets) have gone through the rapid iteration and improvement that happened in the first years of smartphones, and we’ve arrived at a device that is more refined from the first generation. Probably smaller, more robust, and with enough battery life that you don’t really worry about it.

Interface

The interface would obviously depend on what idioms are established over the next few years. On the safe end of the spectrum would be something like the current touch-first interfaces present in the iOS Photos app and Photomator for iOS—a list of sliders that control adjustments, and a big preview image, all contained in a floating rectangle. You’d do some combination of looking at controls and tapping your fingers to make changes to the image.

An obvious problem with an eyes-as-pointer is that you usually want to look at the image while changing the slider, and a naive click-and-drag with your eyes would make this impossible. I’m sure that any sensible developer would realise this immediately, and work out a gesture-based interface where you can look at a control, grab the slider, and then move your hand to change it while your eyes are free to look elsewhere in the image.

Taking the interface one step further, the controls would probably escape the constraints of the app rectangle and become their own floating “window”, allowing you to hold your adjustments like an artist’s palette while your image floats separately in front of you. Sliders to represent adjustments might not even be necessary, each adjustment could just be a floating orb that you select and move your hand to adjust. There are definitely some touch interfaces that use the whole image as a control surface for a slider, and perhaps this will become the norm for spatial interfaces.

Or maybe we’ll go in a less abstract direction; the interface will resemble a sound-mixing board with rows and rows of physical-looking controls, that can be grabbed and moved.

The photo library interface has similar challenges. The safe choice is to simply present a grid of images in a floating rectangle, using the standard gestures for scrolling and selection. Something that I foresee finding frustrating is an insistence for everything to animate, with no alternative. Swapping quickly between two photos to see differences and select the better shot is a common operation, and is made much less useful when there is an animation between the two (this is something I appreciated moving from editing on an iPad to a Mac).

A floating rectangle would get the job done, but doesn’t take advantage of the near-infinite canvas available in your virtual world. Could you grab photos from the grid and keep them floating in space to deal with later—like living directly inside your desktop folder? This will really depend on what the idioms end up being for data management. Perhaps the standard for grouping related objects will be stacks that stay spatially consistent, floating wherever you left them last.

Spatial consistency is obviously very easy to understand, since that’s how the real world works3, but when you start adding more and more data, the limitations of space become more apparent. What I don’t want to happen is the flexibility of the digital world is restricted in order to match the limitations of the real world. In the real world an object can’t exist in two places at once, but in the digital world it can be really useful to eschew this and allow putting photos in multiple albums, or creating different views over the same data.

Data Management

I spend a lot of time working out how to get photos from my camera, into my computer, and then back out of my computer. At this point I’ve got fairly good at it. For new spatial computing devices, I think the data management story will be far closer to my experience editing on my iPad than editing on my Mac. Let’s work through it, step by step.

Getting photos from the camera. In the future, I think photographers will still be taking photos on dedicated cameras. The difference in potential quality and flexibility is just down to physics, having a bigger device to hold a bigger sensor and a bigger lens just gives you better photos4. As much as cameras get better each year, the best way to get the photos from them is still by reading the SD card. Wirelessly transferring photos is slow, painful, and tedious.

My Sony a6500 (which still commonly sells for AU$1,200) which was announced in 2016, has USB 2 (over micro USB) for wired transfers and 802.11n WiFi for wireless. The a6600, which was released in late 2019 has the same connectivity. I don’t foresee wired or wireless transfer eclipsing the convenience of reading the SD card directly for the type of cameras that I buy.5

Maybe your headset will support a dongle, but I am not optimistic. Instead you’ll probably do that little dance of connecting to the camera’s wifi network, and then using some half-baked app you can import the photos. It’s not really clear to me what “background processing” might look like in a headset. If you’ve got 10GB of photos to import, do you need to keep the headset on while its transferring (the same way you’ve got to keep an iPad’s screen on), or can you take it off and have it do work in the background?

Once the photos are on the device you can do the actual fun part of editing them. I assume apps like Photomator will be able to hook into the system photo library just like they do on iOS. Although if you want to do more complicated things that require multiple apps to work together (like stitch a panorama or blend parts of multiple images into one), you’re probably going to have to jump through similar hoops as you do on iOS. The OS might support dragging and dropping images at the flick of your eye, but if the image is silently converted from raw to jpeg in the process, it’s not very useful.

Hand and eye tracking might make the level of precision control more akin to a mouse or trackpad rather than a touchscreen, which could allow apps like Pixelmator Pro to bring their more complicated interface into the headset, but a lack of a wider ecosystem of professional-level tools (and OS features to make data-heavy workflows possible) might cause first movers to shy away.

Once you’ve edited your photos, you can probably share them directly in the headset to friends, social media, or via something like AirDrop to your phone.

Then comes the real scary question: can you reliably back up your data without bring locked in to a single cloud storage provider? Again I see this as being more like an iPad than a Mac, backing up to dedicated photo storage services will be relatively easy, but if you want to backup to something you own, or handle storage off-device (on external drives, etc6) you’re probably out of luck.

Even if you choose to back everything up to a cloud service, you’ll have to make sure that the headset is powered on for long enough for the data to transfer. In my neck of the woods, the internet upload speed I can get at a practical cost is 20Mb/s upload. Perhaps in five years this will have doubled and I’ll have 40Mb/s upload. That’s 5MB/s, so about 5 seconds for a 24MP image, which is about 2 hours to upload all the 1,300 photos from my trip to NZ earlier this year, assuming that the cloud provider can receive the photos that fast, and no one else is using the internet connection. It’s not terrible, but definitely something I’d want to be able to happen in the background while the device isn’t on my face.

Workflow

Let’s imagine that all these problems have been solved (or were never a problem to begin with), how would I see myself using this as my primary photo-editing machine?

Usually I edit photos on my laptop on the couch. I could replace the somewhat small 13” screen with an absolutely huge HDR screen, without even having a desk. The photos could be surrounded by a pure black void, so I could focus entirely on the image, or I could become self-important and place them in a virtual art gallery. Or in the middle of the two, I could edit them in pure black and then see which one would look best framed on my wall.

I’m not sure how I would show my in-progress edits to people, ideally something like my TV could be a bridge between the real and virtual worlds, allowing me to present a single window to it. This would probably work with my TV on my home network, but if I’m at someone else’s house I doubt this would be possible across different platforms—given how fragmented doing this sort of thing is currently. What would probably end up happening is me exporting in-progress photos to my phone and using that to show people, and hopefully remembering to delete them later.7

When I go on a trip I’ll usually bring my laptop so I can sort through my photos and edit some to get some gratification sooner, rather than waiting until I get back home. A headset could be a significant improvement as an on-the-go photo editor: at the very least it’ll be smaller and lighter than my laptop so it’ll take up less of the carry-on allowance and space in my bag8.

Usually my laptop would be left wherever I’m staying, since I can’t realistically use it in bright sunlight or in a vehicle. But a headset could be used in these scenarios, so on the way back from an adventure I could plug myself into the virtual world and edit photos from the back seat of the car or plane or whatever, without having any glare on the screen or getting any debris in the keyboard.

You wouldn’t use your laptop in the back seat of a car going down a windy dirt track from a ski field, but you could totally put on a headset and edit your photos through the car window.


The bottom line for me is that this type of device could be significant jump from what we have now, decoupling the physical limitation of device size from screen size and quality. Most of the hesitation I have is from a practicality perspective; can this be used for the way I work, or do I have to change what I’m doing to suit it?

Obviously the elephant in the room is the social aspect. People have been looking at markings on things ever since the first cave-dwellers realised that you can make a mark on a rock with a stick. Things have progressed slightly since then, but at its core a book or newspaper isn’t that different to a phone or tablet. They’re held in your hand, and you look at them with your eyes. The jump from hand to face is not something I think should be taken lightly.9

  1. These ones! They’re like little extra treats at the bottom of (or hidden within) each post. 

  2. I also read this hilariously negative post on Wired which doesn’t add much new information, but is a fun read. 

  3. Apart from my AirPods, they seem to just disappear and reappear around my apartment and in my bags without me doing anything. 

  4. Maybe in 5 years we’ll all be taking spatial 3D photos, but until we’re all spending all our time in augmented reality, having photos that can be printed at high quality or viewed on a traditional screen will still be common. 

  5. The Sony a7 line of full-frame cameras have had USB 3 and 802.11ac for a few generations now, but they also cost well over twice as much, and I’d guess that most people that use them still read from the SD card directly. 

  6. Not all data needs to be in an off-site backup, and the detritus of shots that didn’t work out is a good example of something that should be backed up but doesn’t require the same level of redundancy as high-quality edited photos. 

  7. A good gauge on how finicky this can be is to imagine you’re in a holiday house and you want to show something on the TV. The only reliable thing to do is bring an HDMI cable and appropriate dongles, and plug in directly. There is no equivalent in the wireless realm yet. 

  8. Well, it’ll take up a different space in the bag, the laptop is a convenient shape for putting in backpacks, a headset less so. Perhaps this means I need a new bag? 

  9. I haven’t really shared my thoughts about this too much, but my general gist is that I think in order to avoid the chances of descending into a cyberpunk hellscape, bringing technology closer to our senses should be done hesitantly. It’s already difficult to exist in society without a smartphone, and using a smartphone makes your activities in the real world more accessible to the online world. Augmenting your vision is allowing software to control your primary way of experiencing the world, and I don’t think I ever want that to be necessary to operate in society.10 

  10. This is obviously not something that will happen in the foreseeable future, but examples that comes to mind is shops removing price tags “since it’s visible in AR anyway”, bus stops and other public markings are removed or outdated as the source of truth is in AR. Once AR is ubiquitous enough to basically be required, then your visual experience in the physical world can be used as advertising space. 


DJI Mini 3 Pro

Most camera reviews are pretty decent when it comes to photo and video quality (although for the type of cameras I buy, photo quality is usually an afterthought1). The thing that seems to be left out is the annoying nits and limitations that you become aware of after using something for a while. I just upgraded from the DJI Mini 2 to the DJI Mini 3 Pro and oh boy do I have nits to share.

A shot of surfers floating over underwater rocks

Shot on the Mini 3 Pro, this one had plenty of room to play with the colours.

Although I would be remiss to omit the difference in image quality. The Mini 3 Pro (which I will just call the “Mini 3” from here to save on typing) is substantially better than the Mini 2. The Mini 2 has a 6.3x4.7mm sensor with a fixed f2.8 aperture, whereas the Mini 3 has a 9.7x7.3mm sensor at f1.7. The much larger sensor (71mm2 versus 30mm2) and larger aperture mean the Mini 3 can shoot with a lower ISO and at a faster shutter speed.

Looking at some of the photos I’ve taken at the beach at the same time of day, the Mini 2 shot at 1/1250s and the Mini 3 shot at 1/2500s. I’ve seriously considered whether I should get an ND filter to let me slow the shutter speed down—that’s just how fast it shoots. This gives me a lot of confidence that I can keep the ISO really low during sunset, sunrise, or on an overcast day (since flying at night in Australia is a no-no).

I don’t really understand enough about cameras to accurately explain why you can edit the Mini 3 photos more. There’s more dynamic range? More bits? Deeper bits? Something for me to understand another time. The end result is that editing the Mini 2 photos feels like trying to sculpt almost-dry clay. You can’t really make substantial changes, and if you try too hard you’ll end up breaking something. On the other end of the spectrum is raw files from the a6500, which can be edited like modelling clay. The Mini 3 isn’t nearly as flexible as that, but it’s substantially better than the 2. I can actually recover some of the highlights, and I don’t have to discard photos because the sky is completely blown out.

A photo of an ocean pool with a wave breaking towards it

Shot on the Mini 2, it’s challenging to get the exposure of the waves right without making the whole image too dark. This is easier in the Mini 3, but still easy to get wrong.

On the Mini 2 I would shoot everything with AEB, so I’d get three photos at different exposures. If I messed the exposure up I could use the brighter or darker exposed version (or both). I have been using this with the Mini 3 on occasion, but have found that the range of a single shot is good enough. The trick seems to be to underexpose quite significantly (I’ve been shooting at between -1EV to -2EV during bright days), which retains highlight detail while still keeping good detail in the shadows.

I haven’t used the 48MP mode enough to have a good feeling of when it makes sense to use it. It would be left on all the time if it didn’t take significantly longer to capture a photo compared to the single-shot mode (since low-light isn’t really possible in Australia). The photos do have an impressive amount of detail, so my thinking is that I’ll only turn it on when I’m taking a shot that could look good printed out really big, or needs to be cropped significantly.

The #1 reason to upgrade to the Mini 3 is actually the improved experience of capturing a top-down panorama. Let me explain.

If you don’t want to capture something from really high up (since the legal limit is 120m) you can capture multiple top-down shots and stitch them together, creating the illusion of taking a photo from a much higher altitude. To do this you point the camera straight down, take a photo, fly the drone forwards, take another photo, and repeat in a grid.

When the drone is stationary, the camera points directly down. When it flies forward, the drone body tilts forward and the camera gimbal tilts upwards to compensate—keeping it pointed down. When the drone stops (especially if it stops suddenly) the body tilts backwards to counteract its forward momentum. The gimbal tries to keep the camera pointed down, but the gimbal on the Mini 2 doesn’t rotate far enough to compensate for the backwards angle of the drone. The result is that the camera view appears to be “kicked” upwards whenever the drone comes to a stop, and you have to adjust it back down before taking each shot.

This could be worked around in software in the Mini 2—once the breaking move is complete, readjust the gimbal to be in the position it was while the drone was in motion. Or you could just re-engineer the next version of the drone to allow the gimbal to rotate far further backwards, allowing it to stay pointing downwards no matter what the drone is doing.

A tasteful topdown drone shot from Newport beach

Shot on the Mini 3 Pro, it’s not too hard to play with the colour from the raw image, and the detail of the footprints in the sand is impressive.

In reality the best thing about the Mini 3 is having true vertical shooting. I don’t know if I’m just a slave to the Instagram 4:5 format or if there’s some other explanation, but I love shooting vertically on the Mini 3. The perspective of a linear feature stretching off into the distance is probably my second favourite drone angle after a top-down shot. With the Mini 2 I would have to throw away almost half of the pixels to get this perspective, but now I can get it for free.

The Rakaia river stretches off into the distance in a low-quality Mini 2 photo

Shot on Mini 2, getting a vertical composition means cropping out the left and right sides of the image.

The next nit is capture speed. The Mini 2 would pause for what seemed like an eternity while it took a photo, and the entire interface would be locked out—including the video feed. The Mini 3 is substantially better, the video feed only drops for a moment and you’re able to see where you’re going while it saves the photo. This is probably the biggest quality-of-life issue I have with the Mini 3, I’d like to be able to just fly around and take photos without having to pause while it reads all the pixels off the sensor.

It hasn’t been too windy around here so I haven’t been able to see how wind-hardy the Mini 3 is, but the Mini 2 would rarely get too bothered by the wind. It would occasionally complain that there was too much wind for it to get home automatically, but you could always keep going and just hope you could fly it home yourself. Probably the most stressed I’ve been while flying a drone was after taking this picture (below), doing another flight further up the valley on the same battery and flying downwind, and then having to fly back against the wind above a huge drop-off with the battery close to running out. Don’t do that, it’s a bad idea. Although the Mini 2 handled the wind like a champ, and I am assured that the Mini 3 is even more capable.

The view down Otira gorge

Shot on Mini 2, you don’t want your battery to run out while over something like this.

My impression of the controller from watching reviews is that the DJI RC—the one with the built-in screen—is completely life-changing and revolutionises the drone-flying experience. I wasn’t convinced, and I only got it because there was a good second-hand price.

I remain unconvinced after using it.

The controller is really good, it’s well-built and comfortable to hold, the buttons are positioned well, and the screen is bright enough to see in sunlight. The shutter button has a two-step press which allows you to focus before you shoot, there are more customisable buttons than the standard RC-N1 which lets you control the portrait-mode camera and suchlike. These are mostly minor benefits, and not something I’d recommend most people spend the extra money on.

The most common claim that reviewers make is that it’s much faster and more convenient to not need a phone to use the drone. Naturally I conducted a test; I timed how long it took for me to setup the Mini 2 and Mini 3. Starting out with the drone and controller out of my bag, I had to unfurl the drone arms, remove the gimbal cover, power the drone and controller on, and connect the phone. The test ended when the drone sent a video signal back to the controller. It took 45 seconds for me to setup the Mini 3, and a minute to setup the Mini 2 with a phone.

That’s 15 seconds of additional fiddling, which is annoying. But it’s only 15 seconds. In both of these tests I was just setting up the drone at my normal pace, I wasn’t trying to be particularly quick—I could probably make both a little faster by working out which thing to turn on first to ensure the controller is booted up and the drone has a GPS connection as fast as possible.

The biggest disadvantage of the DJI RC is that it is much more delicate than the standard controller. The standard controller is built like a robust game controller, it’s hefty and doesn’t have anything that can break easily. When travelling I keep it right in the bottom of my bag alongside the drone batteries. You could drop it on concrete and it would almost certainly be fine. The DJI RC on the other hand has a large screen right on the front. I keep it in a little microfibre bag in case the drone scratches it. I don’t know what I’ll do when I travel with it; maybe I can put it in the bottom of my bag with the screen facing upwards? (It’s a Peak Design Everyday Zip so it’s very well padded anyway)

Oh and the thumb sticks! Both controllers have thumb sticks that screw into the controller, but what no one told me was that the screw threading is much worse on the DJI RC. On the standard controller, the thumb stick is the bolt and the controller has holes. The thread is quite large, and it’s easy to screw them in even if your hands are cold. On the DJI RC, the hole is on the bottom of the thumb stick itself, and the thread is tiny which makes it much more fiddly to put on. I’m now seriously considering whether I could get some custom low-profile thumb sticks made that can stay on the controller permanently.

The Mini 3 Pro is an impressive jump from the Mini 2, which brings my drone photos much closer in quality to photos from my real camera. You can see both types of photos on my photos website, Pixelfed, or Instagram.

  1. The Sony a6X00 line of cameras are incredibly popular for video, and so it was really hard to find useful information comparing photos when I upgraded from the a6000 to the a6500. 


pod, the container manager

I’ve been working on a project to make development using containers easier (specifically Podman), to remove dependency conflicts, and make it easier to run applications on other servers.

The project is called pod, you can learn more at pod.willhbr.net or willhbr/pod on GitHub. It’s a wrapper around the podman command-line tool, with the aim of reducing the amount of boilerplate commands you have to type.

Local versions of both this website and my photos website have been using pod for a while. This has made it really easy to run a server while I’ve been making changes, as well as allowing me to easily daemonise the server and have it continue to run in the background.

At its core, pod is a YAML file that configures the arguments to a Podman command. Most commands will map one-to-one. The simplest example is something like:

# pods.yaml
containers:
  alpine-shell:
    name: pod-alpine-example
    image: docker.io/library/alpine:latest
    interactive: yes
    args:
      - sh

This defines an interactive container that runs an Alpine Linux shell. You can start it with pod run.

Where pod really shines is configuring a setup for a development server, and a production server. As I talked about in my previous blog post, having a development container that mounts the source code from the host machine speeds up development massively. The server behind my photo publishing system follows this pattern, with this config:

defaults:
  build: dev
  run: dev
  update: prod

images:
  dev:
    tag: pixelfed-piper:dev-latest
    from: Containerfile.dev
  prod:
    tag: pixelfed-piper:prod-latest
    from: Containerfile.prod

flags: &default-flags
  feed_url: https://pixelfed.nz/users/willhbr.atom
  repo_url: git@github.com:willhbr/sturdy-guacamole.git

containers:
  dev:
    name: pixelfed-piper-dev
    image: pixelfed-piper:dev-latest
    interactive: true
    autoremove: true
    bind_mounts:
      src: /src/src
    ports:
      4201: 80
    flags:
      <<: *default-flags

  prod:
    name: pixelfed-piper
    image: pixelfed-piper:prod-latest
    interactive: false
    ports:
      4200: 80
    flags:
      <<: *default-flags
      check_period: 54m

When I’m ready to deploy a change, I can build a production image with pod build prod—which will make a release Crystal build—and then start a container on a server using that image.

pod second half is a simple updating system. It will look at the containers running on your server, match their config against the config in pods.yaml, and update any containers that have changed. So instead of having to stop and start the prod container myself, I can just run:

$ pod update --diff prod

Which will show the difference and then update the running containers to match the intent. pod fully supports podman-remote, so it can handle containers running on a different machine just as easily as it can handle those running locally.

I’m super happy with what pod is able to do, and plan on using it to manage building and running any container I use. You can find it on GitHub, the project website, or read my previous post explaining some more of the backstory