Glory Is an Indeterminate Amount of Bandwidth Away

On Mastodon I saw this toot showing a tangle of interconnected AWS services used to host a Wordpress site. I don’t speak AWS so it looks confusing.1 One of the replies linked to this post, which I’d come across last week. Seeing it twice was clearly a sign to share my thoughts.

Overall I agree with the message—you can get a really long way with very little computing power. In university I ran a Rails application that collected entries for sports events, and it was hosted on a $5/month VPS that barely broke a sweat. However the post glosses over some aspects of web hosting that I think are worth considering.

The base assumption is that to be solidly in the top 1000 websites, you’ll need to be serving about 30TB of compressed HTML per month, which averages out to 11MB/s. That’s a lot but not an unfathomable amount. It’s only 88Mb/s which is much less than my home internet download speed. Although sadly it is much greater than my meagre 20Mb/s upload speed—so we can’t host this on a server in my apartment.

The assumption baked into the 11MB/s number is that all your visitors will come and look at your website in a perfectly uniform distribution throughout the day and throughout the month. There can be no variation due to timezones, days of the week, or days of the month. This is almost certainly not the case for this hypothetical website. If it’s an English-first website then the traffic will grow as the US, UK, and Canada are awake, and then drop off as they go to sleep. If you do the maths on a cosine wave, you can see that it’s easy to hit a peak of 22MB/s.

Fluctuations between weekdays and weekends will vary much more based on the type of website you’re running, but we can pretty safely say that you want to be able to exceed that 22MB/s number.

Of course you could be a victim of your own success—you want to be able to handle traffic spikes. Whether it’s a global news event or just a part of people’s daily routine, your traffic is driven by your visitors. Is there something that could cause all your visitors for one day to come in the space of an hour? That’s almost 300MB/s of traffic you’d have to handle.

We’re also making the assumption that visitors will come to the website, download their content promptly, and leave. There are all sorts of things that can go wrong when downloading a file, which might affect the performance of your website. Will a bunch of clients downloading really slowly impact your memory usage? Are there some users with so much data that your database gets locked up executing a huge query when they’re around?

SQLite is amazing. I think the main reason why I wouldn’t pick it for a web server is not performance, but strictness. It does have a strict mode but I’m not sure how much that encompasses. Way back in the day I used to use MySQL for everything (it’s what my dad did) and happily learnt how to write MySQL-flavoured queries. For some reason (maybe an internship?) I started using Postgres and got really confused that my queries were failing. They had been working fine in MySQL.

The reason is that Postgres is much more strict than MySQL2, and it would just throw out my nonsense queries. If we have this query:

SELECT first_name, AVG(age), last_name
FROM people
GROUP BY first_name

Postgres will fail because you can’t select the column last_name that’s not aggregated or not part of the GROUP BY. MySQL will just give you one of the last names in the group.

SQLite takes this to a whole new level, you don’t have to specify the types of columns, you can basically coerce any type into any other type. This makes it great for doing weird messed up things with mostly-structured data3, but I wouldn’t recommend it for running on a server where it’s not too much additional effort to run Postgres alongside your web server.

The post also argues against using “the edge”4, basically stating that the added complexity of getting content to the edge isn’t worth it for the reduced latency. Obviously this again depends on the type of website you’re building, if it’s mostly static then keeping an edge cache up-to-date isn’t too hard, if it’s changing constantly then it’s a huge pain.

It’s definitely worth squeezing as much out of your monolith before you decide to split it up, even if that means migrating to a faster language (like the author’s preferred Elixir). You might even be able to make some interesting product decisions where you defer some work that could be real-time but is cheaper to do in a batch off-peak.

A quick aside about English-speaking countries, the post says:

Plop [a server] in Virginia and you can get the English speaking world in under 100ms of latency.

I know we’ve got different accents down here in the south, but we do mostly speak English in Australia. And we’re not within 100ms of network latency from the US east coast, although I understand the generalisation of it being the centre of the English-speaking world.

If you’re not sharding your application around the world for latency, you might want to shard it for maintainability. You don’t want your 11MB/s of traffic to be dropped on the floor because of a failed OS update on your server. Turning your application into a distributed system increases the complexity dramatically, but also adds so many more ways to operate on it while it’s still running. Things like having two redundant servers so that you can slowly move traffic between them when running a deployment, or take one offline to do maintenance or an upgrade. There are plenty of benefits outside of the increased compute capacity of adding more hardware.

One final thing, I know I’m a huge container nerd but there are plenty of reasons to containerise your application other than horizontal scaling. I keep everything in containers because I like being able to blow away my entire dev setup and start again from scratch. It’s probably easier and to deploy your containerised application on a new server than if you have to go in and manually install the right version of Ruby and all your dependencies. If you’ve got a bug that only appears in production it’s really convenient to be able to run “production” on your local machine, and containers are a great way to do that.

I think it’s important to consider your decisions based on the problem you’re trying to solve. You can prematurely optimise your infrastructure just like you can prematurely optimise your code. You can also choose the wrong architecture that makes scaling impossible, just like you can choose the wrong algorithm that is impossible to optimise. The difficult bit is knowing when it’s the right time for optimisation or rearchitecture.

  1. I did just setup a website on Wordpress.com and that seemed to work pretty well. 

  2. Well, it was in the configuration that I was using over ten years ago. Maybe I could have set different options, or maybe the defaults are different now. I don’t know, I haven’t used either in like seven years. 

  3. I got like halfway through making a MacOS app that lets you use a spreadsheet like an SQLite database and made heavy use of the weakly-typed data to deal with arbitrary input. 

  4. It’s all all-time great heading. You know the one. 


Blogroll: Early 2024

Blogroll, incomplete, early 2024, presented without comment, in no particular order.


It's Not Me, It's Git

tl;dr: I’ve been using jj for version control in my personal projects and it makes me much happier than using git. Continue reading for lukewarm takes on the git CLI.

Firstly I’ll just get some disclaimers out of the way: I only use git (now JJ) for personal projects, I don’t use git at work. Also I work at Google, who currently fund development of JJ since the founder and main contributor is a Google employee—read this section of the readme for more info. This post (along with the rest of this website) is solely my own opinions, and my enthusiasm for JJ (and lack of enthusiasm for git) is just my personal view.


One of my pet peeves is hearing people say that git isn’t hard, you just remember or alias a handful of commands and ignore the rest. While this seems to work for a lot of people, they’re not able to take advantage of having their code in version control.

Imagine that you were learning to program and everything was done in C. You get confused about pointer arithmetic, manual memory management, and void*. Eventually you learn a portion of the language1 that makes sense and meticulously check your entire program after making any change. After doing this for years someone tells you about Python2. You realise that all that time you spent avoiding buffer overruns and segmentation faults could have been avoided altogether.

This is how I feel about git. It’s a tool that gets the job done, but doesn’t empower me to use it confidently to make my work easier. The bar for “oh I’ll just search for the command to do this” is so incredibly low.

The best feature of JJ is it has global undo. You commit something you didn’t mean to? jj undo. Abandoned the wrong change? jj undo. There’s a reason that UX people prefer undo over confirmation dialogs3, it empowers users to move faster doing the thing they think is correct instead of second-guessing and double-checking destructive operations.

I had an almost magical experience with JJ: I tried to rebase some commits, I think I must’ve passed an incorrect option and I ended up with the completely wrong result. If this was git, I would be preparing myself to re-clone the repo or maybe delving into the reflog if that wasn’t possible. Instead I just did jj undo, re-checked the documentation, realised the option I should have used, and ran rebase again.

Knowing that the worst thing I can reasonably do4 is waste some time and have to undo my changes frees me up to actually use version control for more things.

Part of what makes my interaction with git messy is that it differentiates between untracked files, unstaged changes, and staged changes. The result of this is that you’ve got to remember how to move a file (or god forbid, parts of a file) between these states. A foot-gun here is that you could easily think that you’re running a command to unstage a file so that it won’t be added to a commit, but accidentally run a command that reverts the working copy changes for that file.

git restore --staged will unstage a file, but git restore will drop working copy changes to a file—losing your work. Of course you would never make this mistake, but I as a mere mortal am susceptible to these mistakes.

JJ does away with staged/tracked/untracked files, and instead all files are automatically added to the working copy. I’m sure some people that like being able to manicure their staged files will find this as a deal-breaker, but as someone that compulsively runs git add --all so I don’t accidentally leave a file un-committed, this is exactly what I want.

The working copy in JJ is actually just a commit. It starts out with no changes and an empty commit message, but any edits you make are added to it automatically, and you can adjust the commit message as you go.

Initially this seemed like a “ok whatever” implementation detail, but then you realise that all the operations on JJ just have to work on commits. You don’t need to stage and unstage because you just move changes between commits. You don’t need stash because you just leave your changes in a different commit. Basically all the operations you do boil down to the same small set of operations on a commit.

If you forgot to include a change into a commit, in git you would use git commit --amend but in JJ you’re just squashing two commits together (the previous commit and the working copy commit). If you want to amend a commit that’s not the most recent one, you just move your working copy to be that commit using jj edit. Now any changes you make will be added into that commit.

In git you would need to like, make a new commit, then rebase the intermediate commits to re-order it to be next to the target commit, and then squash it into the target. This is basically what JJ is doing under the hood, but to me I’m just swapping over to a commit and making some changes.

This also makes it easier to inspect the state of the repo. In git I constantly get caught out by the fact I can diff staged files, or diff unstaged files, but can’t diff untracked files5. I need to run git diff --cached, but what’s cached? Am I diffing what’s in a cache, or am I showing the cached diff? The answer is that --cached is actually just referring to staged files, and you can also say --staged and get the same result but like, why is --cached there?

We’re really getting into the weeds here, but to use git diff to show the change made in a commit, you need to do git diff $commit~ $commit to tell git to compare between the parent of the commit and the commit itself. From an implementation standpoint this makes sense—you can diff any two commits, so there’s no point to limit the command to just showing a single commit.

I think of a commit as being a diff moving the repository from the old state to the new state. If someone says “oh yeah it changed in this commit” I would expect to be able to look at the diff of that commit and see the line they were talking about highlighted in red or green. This makes the default behaviour of jj diff to be great: it shows the diff of the commit to its parent.

Since there’s no staged/unstaged/tracked/untracked files, jj diff with no arguments just works on the current change—which is likely your “working copy” change—so it shows the diff of what you’re planning to commit.6

I wrote in my post comparing the DJI Mini 2 to the Mini 3 Pro:

The end result is that editing the Mini 2 photos feels like trying to sculpt almost-dry clay. You can’t really make substantial changes, and if you try too hard you’ll end up breaking something. On the other end of the spectrum is raw files from the a6500, which can be edited like modelling clay.

In a similar way, working with git feels like I’m building with some incredibly fragile material that could shatter if I’m not careful. Working with JJ feels like I can mould or re-shape as much as I need.

I had a lecturer in uni that was adamant that students should work on their assignment throughout the semester instead of cramming it in a weekend. They were so paranoid that they created periodic copies of all our repos throughout the semester to check that the history in the final repo hadn’t been tampered with. If you’re on that level, you might be reading this thinking “oh no, if editing history is that easy, you’ll just mess up your whole repo!” This is understandable, but JJ (by default) only allows editing the history that hasn’t been in main, so you’re only allowed to edit commits before you merge them into the main branch.

It’s these kinds of sensible defaults that make JJ more approachable. I like that in git it’s possible to edit the history—for example if you’re helping students work out why it’s so slow to work with their repository after committing multiple gigabytes of test data, then creating another commit deleting it. I’ve been using JJ co-located with git. The repository still has a .git folder and I can run any git command I want, but most of the operations I do through JJ.7

Perhaps it’s just that I’m more invested in using JJ, but after skimming the reference and using it for a few months, I’m able to do more than I am with git. In no small part because I can just repeat the same few commands that operate on commits8.

  • edit swaps to a different commit, allowing you to edit the contents at that commit
  • new adds a new empty commit on top of the current commit
  • abandon deletes the commit
  • split allows you to turn one commit into two (or more) commits
  • rebase lets you prune and splice commit chains
  • diff shows the changes in a commit

Something that’s amazing is that I honestly couldn’t tell you if there’s a way to remove changes from a commit. Since it’s so easy to split and abandon changes, I just do that instead of looking for a command that can do it in one step.

I didn’t think I’d really care about how conflicts are handled, but not having your repo get “locked out” because you’re in the middle of a merge or rebase is just really nice. I almost never get conflicts because my personal projects are basically always just authored by me on one machine, but the few times I’ve run into them it’s freeing to have the option to just go off and do something else in the repo.

Many people think that the main part of software engineering is writing code, but any software engineer will correct you and point out all the talking to people that’s often overlooked. However even just focussing on the time when you’re writing code, a large part of that is just reading other code to work out what to write. If you’ve spent enough time in large codebases you’ll know how important it is to investigate the history of the code—looking at a single snapshot only tells a fraction of the story. Tools that make working with the history easier are incredibly valuable.

You’re going to spend a lot of time using your development tools, you should make sure you’re able to make them work for you.


Ok so I’m sure I’ve linked to Git Koans by Steve Losh before, but I have only now realised that he’s also made a Twitter bot that generates and tweets vaguely-plausible git commands. It’s seemingly broken or intentionally stopped by changes to Twitter—no updates in over six months—but you can still read the code or look at the old tweets. Some good ones:

git delete [-x FILE] [-E]
Delete and push all little-endian binary blobs to your home directory

git clone --record=<tip> [-j] -N
Read 9792 bytes from /dev/random and clone them

git remove [-T] [-U] [--changeset=<changeset>]
Rebase a file onto .git/objects after removing it

  1. An actual true story from when I learnt C in university was that we had a practical exam where we had to write solutions to basic programming and algorithms problems in C. Instead of learning the various functions in libc and their caveats, I just doubled down on pointer arithmetic. You don’t need memcpy when you can just write a one-line while loop that does it manually. I wouldn’t necessarily recommend this as a serious approach to programming C, but it worked for this one exam. 

  2. Or Ruby or Rust or Java or JavaScript or Haskell or Crystal or Kotlin or Go or OCaml or C# or erlang or 

  3. I’m probably butchering this by remembering vibes without context, but you get the idea. 

  4. You can totally reconfigure some things in JJ to allow you to mess up the history of a repo and then force-push that to origin, but you’d have to try really hard. 

  5. I know this one doesn’t really make that much sense, but it’s nice to see a diff of “this is the added contents of this file” rather than just having it be omitted, and then just blindly running git add --all. You can actually use git add -N to pseudo-track a file to make it appear in the diff. This has a side-effect of stopping you from stashing, which I’m sure makes sense from an implementation perspective but as a user this just seems weird. 

  6. “Well actually” it’s already committed, since JJ automatically adds changes in the working copy to the current change. But you know what I mean; conceptually it’s not committed until you’ve chucked a commit message in there and moved on to a new change. 

  7. This is super convenient, because I can still push to GitLab or GitHub or whatever, I can still use basically any tool that relies on a git repo, my history is still just normal git history so it can be inspected or analysed by any tool that works on git repos, and I can still work with anyone that is using plain-old git. 

  8. Oh yeah I think technically they’re changes or revisions, not commits. 


Further Adventures in tmux Code Evaluation

In my previous post I wrote a compiler that turns Python code into a tmux config file. It makes tmux evaluate a program by performing actions while switching between windows. My implementation relies on a feature in tmux called “hooks” which run an command whenever a certain action happens in tmux. The action that I was using was when a pane received focus. This worked great except I had to do some trickery to avoid tmux’s cycle detection in hooks—it won’t run a hook on an action that is triggered by a hook, which is a sensible thing to do.

I don’t want things to be sensible, and I managed to work around this by running every tmux action as a shell command using the tmux run command. I’ve now worked out an even sillier way that this could work by using two tmux sessions1, each attached back to the other, then using bind-key and send-keys to trigger actions.

You start a tmux session with two windows. The first window just runs any command, a shell or whatever. The second window runs a second instance of tmux (you’d have to unset $TMUX for this to work). That second instance of tmux is attached to a second session, also with two windows. The first window also just runs any command, and the second window attaches back to the original session. Here’s a diagram to make this a bit clearer:

diagram of tmux sessions used to run code using key bindings

Session A (blue) has two windows, the first A:1 is just running a shell, the second A:2 is attached to session B (red) which is showing the first window in session B, B:1. Session B also has two shells, the second (B:2) is attached to session A, and is showing window A:1 from session A.

What this cursed setup allows us to do is use send-keys to trigger keybindings that are interpreted by tmux itself, rather than the program running inside tmux—because tmux is the program running inside tmux.

If you have a tmux pane that’s running a program like Vim and you run send-keys a, the character “a” will be typed into Vim. The key is not interpreted at all by the surrounding tmux pane, even if you send a key sequence that would normally do something in tmux, it goes directly to the program in the pane. For example if your prefix key is C-z, then send-keys C-z c will not create a new window, it’ll probably suspend the running program and type a literal character “c”.

However, if the program that’s running in tmux is tmux, then the inner tmux instance will interpret the keys just like any other program.

So if we go back to our diagram, session A uses send-keys to trigger an action in session B. Session B can use send-keys to trigger an action in session A, by virtue of it also having a client attached to session A in one of its panes. The program would be evaluated by each session responding to a key binding, doing an action, and then sending a key binding to the other session to trigger the next instruction. For example, using some of the tricks I described in my previous post:

bind-key -n g {
  set-buffer "1"
  send-keys -t :=2 q
}

bind-key -n q {
  set-buffer "2"
  send-keys -t :=2 w
}

bind-key -n w {
  run 'tmux rename-window "#{buffer_sample}"'
  run 'tmux delete-buffer'
  run 'tmux rename-window "#{e|+:#{buffer_sample},#{window_name}}"'
  run 'tmux delete-buffer'
  run 'tmux set-buffer "#{window_name}"'
  send-keys -t :=2 e
}

# ... program continues with successive bindings

The program starts with the user pressing “g” in session A, which pushes a value onto the stack and sends the key “q” to the second window, which triggers the next action in session B. That next action pushes another value and sends “w” to the second window in session B, which triggers an action back in session A. This action does some juggling of the buffer stack and adds the two values together, putting the result on the stack. It then sends “e” to the second window in session A, triggering whatever the next action would be in session B.

This should also allow the compiler to get rid of the global-expansion trick, in the last post I wrote:

Wrapping everything in a call to run gives us another feature: global variable expansion. Only certain arguments to tmux commands have variable expansion on them, but the whole string passed to run is expanded, which means we can use variables anywhere in any tmux command.

Since we’re no longer using windows as instructions, it’s much easier to use them as variable storage. This should remove the need for storing variables as custom options, and using buffers as a stack.

The stack would just be a separate, specifically-named session where each window contains a value on the stack. To add a value, you write the desired contents to that pane using either paste-buffer to dump from a buffer, or send-keys to dump a literal value. You can get that value back with capture-pane and put it into a specific buffer with the -b flag.

Options can be set to expand formats with the -F flag, so you can put the contents of a window-based variable into a custom option with a command like set -F @my_option '#{buffer_sample}'. This would allow for some more juggling without having to use the window and session name, like I did before.

Ideally you would have a different variable-storage session for each stack frame, and somehow read values from it corresponding to the active function call. This might not be possible without global expansion of the command, but if you allowed that then you’d avoid the problems that my current implementation has with having a single global set of variables.

The astute among you might be thinking “wait Will, what happens when you want to have more than 26 or 52 actions, you’ll run out of letters!” Well, tmux has a feature called “key tables” which allow for swapping the set of active key bindings, so all you need to do is have each letter swap to a unique key table, and then the next letter actually does an action, which gives you enough space for 2,704 actions, if you only use upper and lower-case letters. But you can have as many key tables as you want, so you can just keep increasing the length of the sequence of keys required to trigger an action, allowing for more and more actions for larger programs.

I don’t think I’ve really worked around the “no global expansion” limitation that I imposed, but I think this shows there are enough different avenues to solve this that you can probably assemble something without the trade-offs that I made originally.

  1. Actually you can probably do this with one session connected back to itself, but I only realised this after I’d written up my explanation of how this would work. 


Making a Compiler to Prove tmux Is Turing Complete

You can use features of tmux to implement a Turing-complete instruction set, allowing you to compile code that runs in tmux by moving windows.

I feel like I really have to emphasise this: I’m not running a command-line program in tmux, or using tmux to launch a program. I can get tmux to run real code by switching between windows.

Watch a demo of it in action below or on YouTube:

This whole mess started when I solved an issue I had with a helper script using the tmux wait-for command. I thought to myself “wow tmux has a lot of weird features, it seems like you could run a program in it”. This idea completely took over my brain and I couldn’t think of anything else. I had to know if it was possible.

I spent a week writing a compiler that turns Python(ish) code into a tmux config file, which when you load makes tmux swap between windows super fast and run that code.

If you just want to run your own code in tmux, you can grab the compiler from GitHub or see it in action in this video.


I’m not really a byte-code kinda guy. I’ve tinkered around with plenty of interpreters before, but those were tree-walk interpreters, or they compiled to another high-level language. I haven’t spent much time thinking about byte code instructions and how VMs actually get implemented since my second year of university where we had to implement a simple language that compiled to the JVM. I do own a physical copy of the delightful Crafting Interpreters by Robert Nystrom, which I assume counts for something.

One thing I’m pretty sure I need is a stack. The easiest way to evaluate an arbitrarily-nested expression is to have each operation take the top N items from the stack, process them, and put the result on the top of the stack. The next operation takes another N items, and so on.

At every stage of this project I could think of a solid handful of different tmux features that could be used (or abused) to implement the functionality. For the stack the easiest option was to use buffers.

Buffers are supposed to be used for things like copy-pasting, but the buffer commands have some neat side-effects. If you call set-buffer 'some value' with no buffer name, you get a buffer named bufferN with “some value” in it. Every time you call set-buffer it gets added to the top of the list of buffers. Every time you call delete-buffer (without specifying a buffer name) it’ll delete the topmost buffer from the list.

And just to make this even more convenient, there’s a string expansion #{buffer_sample} that will give you the contents of the topmost buffer. We’ve got the perfect feature for implementing a stack.

Ok, string expansions. Most tmux commands allow for expanding variables so you can inject information about the current pane, window, session, etc into your command. For example to rename a window to the path of the current working directory, you can do:

rename-window '#{pane_current_path}'

These expansions are documented in the “formats” section of the tmux manual. The most obvious use of these is to define the format of your status line. For example the left hand side of my status line looks like:

set -g status-left '#[bold] #{session_name} #[nobold]│ #{host} │ %H:%M '

#{session_name} and #{host} are replaced with the name of the current session, and the hostname of the machine that tmux is currently running on.

If you read the manual in a little more detail, you’ll notice that you can actually do a little more than just inserting the value of a variable. There is a conditional operator, which can check that value of a variable and output one of two different options. I use this to show a “+” next to windows that are zoomed:

set window-status-format ' #I#{?#{window_zoomed_flag},+, }│ #W '

#{window_zoomed_flag} is 1 if the current window is zoomed, so the window gets a + next to the index. If the window is not zoomed, then it gets an empty space next to the index.

There are also operators for arithmetic operations, so #{e|*:7,6} will expand to 42, and #{e|<:1,5} expands to 1 (tmux uses 1 and 0 for true/false).

Now of course you could just make a huge variable expansion and use that to make a computation, but that is quite limited. You can’t make a loop or have any action that has a side-effect.

The feature that really gets things going is hooks. You can run a tmux command whenever a certain event happens. For example, if you want to split your window every time the window got renamed:

set-hook window-renamed split-window

Now whenever you rename a window, it gains a split! Splendid. I never really found a legitimate use for hooks, otherwise I’d give you a less contrived example.

I did of course find a completely illegitimate use for hooks. There’s a hook called pane-focus-in that is triggered whenever a client switches to that pane. This is the key feature that makes the compiler work. You can set the hook to run multiple commands, so we can say “when you focus on this window, do X, then look at the next window”. Something like:

set-hook pane-focus-in {
  set-buffer 'some value'
  next-window
}

Now this doesn’t actually work for what I want, as tmux is too smart and won’t trigger the pane-focus-in event on the next window, since it wants to avoid accidentally creating cycles in window navigation. This is annoying if you are trying to intentionally create cycles in your window navigation.

However, if you instead wrap the commands in a shell call, that check gets skipped:

set-hook pane-focus-in {
  run "tmux set-buffer 'some value'"
  run 'tmux next-window'
}

Some might say that this is cheating, but the shell is just being used to forward the command back to tmux—I’m not using any features of the shell here.

Wrapping everything in a call to run gives us another feature: global variable expansion. Only certain arguments to tmux commands have variable expansion on them, but the whole string passed to run is expanded, which means we can use variables anywhere in any tmux command. For example:

This will add a buffer containing the literal string '#{session_name}':

set-buffer '#{session_name}'

But this will add a buffer containing whatever the current session name is:

run "set-buffer '#{session_name}'"

The last ingredient we need is some way to store variables. I had considered storing these as window names, but setting and retrieving these would have been a huge pain, even if it was technically possible. I ended up going with the low-effort solution. You can set custom options in tmux as long as they’re prefixed with @. This has the limitation that you’ve got a single set of global variables1, but it’ll do.

set @some-option "some value"
display "option is: #{@some-option}"

So what does it look like to actually do something? When we run the expression 1 + 2, the result should be stored in the top of the stack.

First we add our two operands to the stack using set-buffer. We could inline them, but I’m going for brute-force predictability here, with absolutely no regard for optimisation.

new-window
set-hook pane-focus-in {
  run "tmux set-buffer '1'"
  run 'tmux next-window'
}

new-window
set-hook pane-focus-in {
  run "tmux set-buffer '2'"
  run 'tmux next-window'
}

The next bit is a little tricky, we need to have access to two values from the stack to do the addition operation, but we can only access the top using #{buffer_sample}. We can work around this by using the window name as a temporary storage space. We’re not using the window name for anything else, and it only needs to stay there for two instructions.

We rename the next window to be the top of the stack, and delete the top item from the stack. We need to keep track of window indexes for this trick (:=4 targets window number 4), which will also be needed when we implement conditionals and goto.

new-window
set-hook pane-focus-in {
  run 'tmux rename-window -t :=4 "#{buffer_sample}"'
  run 'tmux delete-buffer'
  run 'tmux next-window'
}

We’ve got our two values accessible now—one in buffer_sample and one in window_name so now we can finally add them together:

new-window
set-hook pane-focus-in {
  run 'tmux rename-window -t :=4 "#{e|+:#{buffer_sample},#{window_name}}"'
  run 'tmux delete-buffer'
  run 'tmux set-buffer "#{window_name}"'
  run 'tmux next-window'
}

We rename the current window to be #{e|+:#{buffer_sample},#{window_name}}, which adds the two numbers together, replacing our window name scratch space. Next we delete the top of the stack (the topmost buffer) since we’ve consumed that value now, and put the result of the operation onto the top of the stack. Finally we advance to the next instruction.

This is the basis of all the operations needed to implement a simple Python-like language. To implement conditionals we just use a conditional expansion to determine which window to change to, instead of always using next-window:

new-window
set-hook pane-focus-in {
    run 'tmux select-window -t "#{?#{buffer_sample},:=6,:=9}"'
    run 'tmux delete-buffer'
}

If buffer_sample is 1 (or any other non-empty and non-zero value) we go to window 6, if it’s 0 or empty, then we go to window 9. Loops are implemented in a similar way, just with an unconditional jump to a window before the current one.

The biggest challenge when I implemented the compiler for Shortcuts was the fact that Shortcuts doesn’t really have support for functions. I could have just dumped all the functions into a single tmux session, and jumped around to different window indices when calling different functions. But that seemed too easy.

Instead I made each function its own session, and used switch-client to swap the current client over to the other session. This gets difficult when you want to return back to the calling function.

I don’t know how real byte code does this (see disclaimer above) but I figured that I could just put the return point on the stack before calling a function, and then the function just has to do a little swap of the items on the stack and call switch-client again.

I needed to use both the session name and the window name as scratch storage to get this to work, but the return instruction ends up like this:

new-window
set-hook pane-focus-in {
  # the value to return
  run 'tmux rename-session -- "#{buffer_sample}"'
  run 'tmux delete-buffer'
  # the location to return to
  run 'tmux rename-window -- "#{buffer_sample}"'
  run 'tmux delete-buffer'
  # put return value back on stack
  run 'tmux set-buffer "#S"'
  # restore session name
  run 'tmux rename-session -- "func"'
  run 'tmux switch-client -t "#{window_name}"'
}

The function call instruction is much simpler, you just need to add all the arguments onto the stack, and then do:

# put the return point on the stack
new-window
set-hook pane-focus-in {
  run "tmux set-buffer 'main:3'"
  run 'tmux next-window'
}

# any arguments would be added here

# switch the client to call the function
new-window
set-hook pane-focus-in {
  run 'tmux switch-client -t func:1'
}

I know at compile time the exact instruction to jump back to, so that main:3 is hard-coded into the program to be the name of the current function and the index of the window after the switch-client call.

Since window 0 on every session is “free parking”, you switch directly to window 1 which kicks off the function. The return value from a function is whatever item is on the top of the stack when the function jumps back to the caller.

So I’ve got a subset of Python to run on tmux that can only use numbers. Is this Turing-complete?

I don’t know. I assume it is, or at least it’s close enough that you could make some changes and end up with a Turing-complete language that compiles and runs on tmux. This was enough to satisfy my curiosity and say “yep tmux is probably Turing-complete”, but I don’t want to go on the internet and make that claim without completely backing it up.

So obviously I have to make a full-featured compiler for a Turing-complete language. So I also wrote a Brainfuck-to-tmux compiler.

Brainfuck is exceptionally simple; it only has eight instructions:

  • > and < move the data pointer to the right and left
  • + and - increment and decrement the byte at the current location
  • , reads one byte from the input stream and places it on the data pointer
  • . writes the current byte to the output stream
  • [ jumps to the matching ] if the current byte is zero, otherwise continues as normal
  • ] jumps back to the previous matching [ if the current byte is non-zero, otherwise continues as normal

Initially I thought about using an infinite sequence of windows to represent the data, but then I realised that I could just create numbered variables on the fly, which is much simpler. The session name acts as a data “pointer”, the windows again act as instructions, I pull from a variable for input, and use send-keys to the first window as output.

The instructions look like this:

new-window
set-hook pane-focus-in {
  run 'tmux rename-session -- "#{e|-:#S,1}"'
  run 'tmux next-window'
}

new-window
set-hook pane-focus-in {
  run 'tmux rename-session -- "#{e|+:#S,1}"'
  run 'tmux next-window'
}

< and > (above) are super simple—they just rename the session to be one more or less than the current session name. The default tmux session name is 0 so I don’t even need to set it initially.

new-window
set-hook pane-focus-in {
  run 'tmux set -s "@data-#S" "#{e|%:#{e|+:#{E:##{@data-#S#}},1},256}"'
  run 'tmux next-window'
}

new-window
set-hook pane-focus-in {
  run 'tmux set -s "@data-#S" "#{e|%:#{e|+:#{E:##{@data-#S#}},255},256}"'
  run 'tmux next-window'
}

These two implement + and -. They read from and store their result in the variable @data-#S, #S being the session name which I’m using as the data pointer.

#{E: allows for double-expanding variables, so I can expand @data-#S into something like @data-0 and then expand that into the value stored in that variable. If the variable doesn’t exist it expands to an empty string, and when you add or subtract from an empty string it gets implicitly converted to 0.

I have to modulo the results by 256 as Brainfuck expects an array of bytes, not arbitrarily large numbers. I didn’t realise this from my extensive research of skimming the Wikipedia page, so it took a bit of head-scratching while my program was looping out of control.

new-window
set-hook pane-focus-in {
  run 'tmux select-window -t ":=#{?#{E:##{@data-#S#}},6,7}"'
}

new-window
set-hook pane-focus-in {
  run 'tmux select-window -t ":=#{?#{E:##{@data-#S#}},5,7}"'
}

I thought that [ and ] would be tricky until I realised that I could pre-compute where they jumped to (I’d only ever implemented Brainfuck as a dumb interpreter before). They use the same select-window logic as the conditionals in the Python compiler.

new-window
set-hook pane-focus-in {
  run 'tmux set -s "@data-#S" "#{=1:@input}"'
  run 'tmux set -s "@input" "#{=-#{e|-:#{n:@input},1}:#{?#{e|==:#{n:@input},1},0,#{@input}}}"'
  run 'tmux next-window'
}

new-window
set-hook pane-focus-in {
  run 'tmux send-keys -t ":=0" "#{a:#{e|+:0,#{E:##{@data-#S#}}}}"'
  run 'tmux next-window'
}

This has some serious tmux expansion going on, but the basic idea is to implement , by taking the first character from the @input option, and then truncate the first character from @input. This is easier said than done as it requires getting the length and calculating the substring manually.

. is much simpler, I just take the current value and pass it to send-keys, using the #{a: expansion filter to turn the number into an ASCII character.

A limitation of my implementation is that the input will only get interpreted as numbers—tmux doesn’t have a way to convert ASCII characters to their numeric code points.

screenshot of tmux in a terminal with "Hello world" printed in the top left

This still from the video shows the output of the Brainfuck “Hello world” program from Wikipedia.

If you look at any of the compiled example programs in the repo you can see that I’m not exactly generating the most optimised code. For example to run this super simple program:

a = 1
print(a)

The compiler will:

  1. Push 1 onto the stack
  2. Set @a to the top of the stack
  3. Pop the top of the stack
  4. Push the value of @a onto the stack
  5. Call display-message with the topmost element from the stack
  6. Pop the top of the stack
  7. Push 0 as a “return value” of print to the stack
  8. Pop the top of the stack, since no one consumes it

All that could be replaced with something much simpler:

  1. Call display-message with the value 1

But that requires much more analysis of the actual program, and I’m not going for efficiency here, so I accepted generating unnecessary instructions.

Like I mentioned earlier, there are plenty of other ways that the data could be modelled. I was considering using window names to store my variables, but you could also store data in the tmux window buffers themselves—using send-keys and capture-pane to read and write data. Or maybe you could have nested sessions, where the outermost session windows are the instructions, and the inner session windows are the data. Window splits and layouts would be another possibility for storing data. That’s also not even considering the possibility of moving windows around to change how the program runs while it’s running. Perhaps update-environment is a better variable store than custom options?

If you want to continue this project and implement an LLVM backend that targets tmux, or just want to hack around with tmux in general, you use the -L some-socket flag to run a separate server, so you don’t mess up your actual tmux server. Instead of starting a normal shell in every window, I ran tmux wait-for main. That way I could run tmux wait-for -S main to close every single window at once—since if you try and close them one-by-one you end up running parts of your program. Alternatively, tmux kill-server will probably do the trick.

Overall I’m super happy at how well this ended up working, and how directly the various concepts of a normal instruction set can be mapped to tmux commands.

I ran a benchmark to see how tmux-python compares to Python 3.11.4. I didn’t want to wait around for too long so I just used my is_prime example to check whether 269 is a prime. On my dev machine, Python runs this in 0.02 seconds, whereas my tmux version takes just over a minute.

  1. Technically it’s a set of variables per function if you pass the -s flag to set the option only on the current session, but not per function call. So if you have a function f that sets variable a and then calls itself, a will contain the value set from the previous function. 


tmux.conf, With Commentary

I’m a very heavy user of tmux, and like to share how I make the most of it. This was going to be a short list of some nice things to know and some pointers to features people might not be aware of, but then I realised it’s probably easier to just explain the stuff that I have configured, and so here we are. I grabbed the current version of my tmux.conf and added an explanation after each section.

This assumes that you use tmux in the same way that I do. Some people like to just use it as a way to get a few pre-defined splits in their terminal and they never want to change those splits. Other people just use it in case their ssh connection drops. When I’m working I basically always have a large or full-screen terminal open that’s connected via SSH to a server, and on server running tmux attached to a session for the specific project that I’m working on. If I work on a different project I’ll just detach from that session and start a new one.

So with that in mind, let’s dive in…

# GENERAL BITS AND BOBS
unbind -T root -aq
unbind -T prefix -aq
unbind -T nested -aq
unbind -T popup -aq
unbind -T copy-mode -aq

The unbind command will remove all bindings in a key table. I do this so that anything I set while tinkering will get unset and replaced with the config (reducing the chances of getting into a weird state), and because I’ve chosen to redefine every key binding myself, this removes any double-ups. This is not something that I’d recommend others do, since you’ve got to be pretty familiar with all the bindings that you use regularly and define them yourself before this is actually practical.

In tmux a key-table is just a set of key bindings. The two most important ones are prefix and root. The prefix table contains all the bindings that can be used after you enter your prefix key, and root contains all the bindings that can be done without having to first enter the prefix.

The prefix key is just tmux’s way of “namespacing” its shortcuts off so you’re not going to have a conflict with another program. tmux doesn’t add any key bindings in the root table by default.

Since I know the programs that I’m going to be using—and know the keys that I’ll use in those programs—I heavily use the root key table to add shortcuts that are faster to activate (and activate repeatedly) without having to first press the prefix.

You can totally abuse the root key-table too, for example you can make a binding so that whenever you press “a”, “b” is what gets sent to the shell:1

bind-key -T root a send-keys b

bind-key -n is just a short-hand for bind-key -T root.

set -g mode-keys vi
set -g status-position bottom
set -g base-index 1
set -g renumber-windows on
set -g default-terminal 'screen-256color'
set -g history-file ~/._tmux-history
# set -g prompt-history-limit 10000

This is just some fairly basic config for the standard behaviour of tmux. I use vim keybindings for copy-mode since those are the shortcuts I am familiar with. The status bar (with the list of windows, etc) lives at the bottom. Windows are numbered starting from 1 instead of 0, since if I use a “switch to window X” shortcut, having the window indices match the order of the keys on a keyboard is nice. Although I don’t actually use the shortcuts for switching directly to a window by number, since it’s almost always faster for me to just mash “next window” a bunch of times until I’ve got the window I need.

When I first started using tmux I think I had default-terminal incorrectly set to xterm-256color—the standard for most terminal emulators—which caused some background colours to render incorrectly. It should basically always be screen-256color unless you’re doing something weird where you don’t have 256 colours, but that’s unlikely. It might be set to this by default in tmux, but I just keep this here to be sure.

set -g prefix C-z
bind C-z send-prefix
bind r {
  source-file ~/.tmux.conf
  display 'config reloaded'
}

As I’ve mentioned before, I use C-z as my prefix shortcut. It’s more convenient to press than the default C-b, and I don’t suspend tasks using C-z very often (which is what it usually does). If I do need to suspend a task I can just press it twice (courtesy of bind C-z send-prefix) which is not particularly inconvenient.

I’ve bound C-z r to reload my tmux config, which also isn’t something I do that often but it’s more convenient than having to type out the whole source-file command manually. A neat trick that I learnt a while ago is that tmux supports multi-action commands by wrapping them in curly braces. This is super nice both to make the config more readable, as well as allowing for confirmations that the action has happened using the display command.

set -s escape-time 0
set -g focus-events on
set -g allow-rename on

Just some more default settings, I don’t think any of these are particularly important—in fact, I’m pretty sure that first one should be set -g not set -s but evidently it’s not been an issue so it’s remained like this. I can’t remember why I turned focus events on, I think it to make some vim plugin work? I’m fairly confident that I don’t use the plugin any more, so this is probably obsolete. allow-rename allows an escape sequence to change the window name. I don’t dutifully set meaningful window names, so any program that wants to give me a useful name is more than welcome to.

# SHORTCUTS
bind c new-window -c '#{pane_current_path}' -a -t '{next}'
bind -n M-c new-window -c '#{pane_current_path}' -a -t '{next}'
bind -n M-z resize-pane -Z

On the topic of making common actions really convenient, I bind M-c to open a new window since C-z c is just a tiny bit too slow—although I keep that binding around just in case I’ve got more time on my hands, I guess. I also have set the two options here to open the new window in the same directory as the current pane (doing anything else just doesn’t make sense to me). That -a -t '{next}' means that the window will open directly next to the current one, rather than at the end.

M-z zooms the current pane—hiding all other panes in the same window—which is useful to focus on one thing quickly, or to copy text from the window.

bind x confirm-before -p "kill-pane #P? (y/n)" kill-pane
bind '$' command-prompt -I "#S" { rename-session "%%" }
bind ',' command-prompt -I "#W" { rename-window "%%" }

bind d detach
bind C-d detach
bind : command-prompt

Since I remove every single key binding, I have to add back every operation I want, and sometimes I do just want the default keybinding back. In this case I re-add C-z x to kill a pane, C-z $ and C-z , to rename sessions and windows, C-z d to detach from the session, and C-z : to open the tmux prompt.

It’s neat that these two-step commands that ask for input or confirmation are actually implemented with other tmux commands, rather than being baked into the “dangerous” commands as additional options. This means that if I really wanted, I could add a confirmation step before opening a new window, or detaching from a session.

The smart move in this section is actually bind C-d detach. I would constantly press C-z and then press d just before I’d released the control key, which result in nothing happening. Instead of learning to be more careful with my keystrokes, I just added a mapping so that mistaken keypress also did what I was intending.

bind m {
  set -w monitor-bell
  set -w monitor-activity
  display 'window mute #{?#{monitor-bell},off,on}'
}

This is something I’ve only really added recently. You’ll see below that there’s a window style for windows with activity (ie: their shell has printed output while in the background) as well as windows that have sent a terminal bell, and I use that to change the colour of the window in the status bar. However, sometimes I find this a bit annoying, and I want to just be able to run something (like a server) in the background and not care that it’s printing output, so I have a way to turn off the monitoring for just that window.

If you don’t pass an argument to set for an option that’s a boolean, then it gets toggled. So in this case I’m relying on the fact that I don’t change these options any other way, and that toggling them both won’t ever get them out of sync. I could probably do this “properly” to ensure that they’re consistent, but it’s not really an issue I care to fix.

Another example of multi-line commands making things easier to read.

bind s send-keys -R Enter
bind S {
  send-keys -R Enter
  clear-history
}

Sometimes I want to run a command and then search in the output. It’s really annoying to have previous commands’ output messing up the search, especially if you’re repeatedly running a test or looking at logs and trying to search for some message. I could just open a new pane each time, but it’s easier for me to just wipe out the scrollback history in the current pane.

C-z s (lowercase “s”) is equivalent to the “clear” command, except I can do it while a command is running. C-l in most terminals does the same thing, but I have that re-bound to pane navigation.

C-z S (uppercase “S”) clears the screen and the history, again doable while a command is running.

I send Enter after clearing the screen to force any prompts to re-draw, otherwise you can be left with a completely blank screen.

# NESTED MODE
bind -n M-Z {
  set status
  set key-table nested
  set prefix None
}
bind -T nested M-Z {
  set status
  set key-table root
  set prefix C-z
}

If you’ve messed around with tmux enough you’ve come across the warning:

sessions should be nested with care, unset $TMUX to force

This of course is just a warning, and so naturally I have a whole system to nest tmux sessions. This is useful if you’re always in tmux and ssh from one machine to another. You don’t want to exit out of tmux locally (obviously) and you want to run tmux on the remote computer in case your connection drops so you don’t interrupt any in-progress jobs.

What I’ve done is something like a “more zoomed” mode2. This will hide the status bar of the outer tmux session and disable all key bindings except one to get out of this nested mode.

So when I ssh to another machine I can press M-Z and all my local tmux UI disappears, so when I start tmux on the remote machine it looks and behaves like I’m connected directly, not nested. If I need to use the local session, I can press M-Z again and the local tmux UI reappears and the key bindings reactivate, allowing me to move around in the local session, with the remote session being relegated back to its own window.

Where this gets really clever is in my shell wrapper around ssh. It checks that I’m in a tmux session, and automatically switches to the nested mode when I start an ssh connection, so I don’t even have to press a key.

This doesn’t really work with triply-nested sessions however, since the second time you press M-Z the outer session with un-nest itself, rather than the middle session nesting itself. If I had two separate bindings—one for “nest” and a different one for “unnest” then it would work, but that would be 100% more nesting-related shortcuts to learn, and I don’t triple-nest enough to justify that.

bind -n M-V split-window -h -c '#{pane_current_path}'
bind -n M-H split-window -v -c  '#{pane_current_path}'

bind V move-pane -h
bind H move-pane -v

Creating splits is one of the things I do the most, so naturally I have a no-prefix shortcut for it. I think of splits the way Vim does them, with horizontal/vertical being the way the line goes, rather than the orientation of the panes themselves. So I’ve swapped the letters for the bindings here, M-V gives me a horizontal tmux split, because I think of that as being vertical like :vsp in Vim.

These last two bindings are for moving panes into windows, but I almost never do this because it’s almost always easier to just open a fresh new split.

bind -n M-n next-window
bind -n M-N swap-window -d -t '{next}'
bind -n M-m previous-window
bind -n M-M swap-window -d -t '{previous}'

In Vim I use C-n and C-p to navigate buffers, so I wanted to use M-n and M-p in tmux to navigate windows. But I think for some reason that didn’t work, although I just tried it now and it totally does work. However my muscle memory is now locked onto the completely nonsensical M-m to go to the previous window.

The uppercase versions of both of these bindings move the window, it’s like holding down shift “grabs” the window as you navigate.

bind -n M-s choose-tree -Zs -f '#{?#{m:_popup_*,#S},0,1}' -O name

choose-tree is a neat way of swapping between tmux sessions—some people might use the next and previous session shortcuts, but I’ve settled on the navigable list.

This gets weird with my “popup” sessions (see below and the blog post I wrote about it), so I have a filter to hide them from the list, since they all start with _popup_.

bind C {
  select-pane -m
  display 'pane marked: #{pane_id}, move with <prefix>V or <prefix>H'
}
bind -n M-L break-pane -a -t '{next}'

C-z C is how I would merge panes back into the same window, if I ever actually wanted to do this, but I very rarely do. This works because the default target for move-pane is the marked pane, so this binding is just marking a pane to be the default for moving.

break-pane is super useful, and I like M-L as a shortcut because “l” is “navigate right” in Vim-land, and the pane pops up as a window to the right, so it all makes sense. I’ll often run a command (like a test or build) in a split and then want to continue focussing on my editor, and use break-pane to move the split into a new window without interrupting the running process.

bind Space next-layout
bind Tab rotate-window

next-layout shuffles through a predefined list of layouts for the panes in a window. It’s somewhat useful to avoid having to manually resize splits, or just as something to keep me entertained while I wait for something to finish. rotate-window shuffles the order of the panes while maintaining the same layout, which I basically use as “oh no my editor is on the right and it needs to be on the left because that’s where the editor lives” C-z Tab problem solved.

# COPY MODE

bind -n C-o copy-mode
bind -n M-p paste-buffer -p
bind -T copy-mode-vi v send-keys -X begin-selection
bind -T copy-mode-vi y send-keys -X copy-selection

I actually lied earlier, I don’t unbind every single key binding, I leave copy-mode-vi as-is. It basically just uses the standard navigation commands that I’m used to from Vim or less, so I don’t feel a need to change anything. The one thing I do set is using v to start a selection and y to copy that selection. This is what Vim does and so it’s just making things a little more consistent.

Since I don’t use mouse-mode in tmux, entering copy-mode quickly is essential. I chose C-o as it’s close to C-u which is the shortcut to scroll up, so I can quickly press C-o C-u and be scrolling up through the pane output.

bind -n M-1 select-window -t :=1
bind -n M-2 select-window -t :=2
bind -n M-3 select-window -t :=3
bind -n M-4 select-window -t :=4
bind -n M-5 select-window -t :=5
bind -n M-6 select-window -t :=6
bind -n M-7 select-window -t :=7
bind -n M-8 select-window -t :=8
bind -n M-9 select-window -t :=9

As I mentioned before, I don’t actually use these, they’re basically just here for like tradition or something. It’s basically always easier to just press M-n or M-m to cycle through my windows (I’d say I usually have <5 in a session) because that’s what my muscle memory is used to doing.

# STATUSBAR
set -g status-interval 60

set -g status-left-length 100
set -g status-right-length 100

set -g status-style bg=default
set -g status-left-style fg=colour0,bg=colour$HOST_COLOR
set -g status-left '#[bold]#{?#{N/s:_popup_#S},+, }#S #[nobold]│ #h │ %H:%M '
set -g status-right-style fg=colour250
set -g status-right '#[reverse] #(cat /proc/loadavg) '

# WINDOW INDICATORS
set -g window-status-separator ''
set -g window-status-format ' #I#{?#{window_zoomed_flag},+, }│ #W '
set -g window-status-style fg=colour245,bg=default
set -g window-status-activity-style fg=colour$HOST_COLOR,bg=default,bold
set -g window-status-bell-style fg=colour0,bg=colour$HOST_COLOR,bold
set -g window-status-current-format ' #I#{?#{window_zoomed_flag},+, }│ #W '
set -g window-status-current-style fg=colour231,bg=colour240,bold

This is a super dense section, and to be honest a picture is the easiest way to communicate what it’s doing:

tmux status line

All my computers have a unique $HOST_COLOR set, and I use that to set the highlight colour for a bunch of things in tmux as well as my zsh prompt. The screenshot above shows the colour that I use on my main computer, ANSI colour 183, which almost exactly matches the highlight colour for my website in dark mode. This is something I setup when I was in university and my time was split between my laptop and a few servers fairly frequently, so having them be immediately identifiable was really useful. Now it’s just nice that I can change one file and have a new colour.

The left side of the status bar has the session name, host name, and current time. If there is a popup shell (see below) then I get a simple “+” indicator next to the session name (that’s what the #{?#{N/s:_popup_#S},+, } is doing).

The one hard requirement I have for the window indicators is that when I navigate through them, they don’t jump slightly due to the width of the active window indicator being different to the inactive window indicator. This is why I have the window-status-separator to be '' and make window-status-format and window-status-current-format take up exactly the same number of characters. I differentiate the active window with brighter, bold text and a lighter background.

I’ve been considering adding bit more info to the window indicators—perhaps removing the window number to give myself some more space—but currently the only additional piece of information is whether the window has a zoomed pane or not: #{?#{window_zoomed_flag},+, } will add a “+” after the window index if there’s a zoomed pane. To me the plus is “there’s more stuff that you might not see immediately” and I use that both for the popup shells and for zoomed panes.

If a pane has activity, then the text colour changes to $HOST_COLOR which makes it easily noticeable. If there’s a bell, then the background changes to $HOST_COLOR which is even more noticeable. Both will be cleared automatically when you navigate to that window.

I have my build scripts send a bell when they finish so that I can kick them off in another window and then easily see when they finish. I’ve also recently added a neat feature where instead of just sending a bell, they set the tmux bell style to have a green or red background depending on whether the build (or test) passed or failed, and then send the bell. This way I can emotionally prepare myself before switching windows to look at the failure.

The right side of the status bar is basically just free space, I have it set to just dump the loadavg there, which I find vaguely interesting to watch as I do a particularly resource-intensive task.

# MESSAGES
set -g message-style fg=colour232,bg=colour$HOST_COLOR,bold

# PANE SPLITS
set -g pane-border-style fg=colour238
set -g pane-active-border-style fg=colour252

# CLOCK AND COPY INDICATOR
set -g clock-mode-colour colour$HOST_COLOR
set -g mode-style fg=colour$HOST_COLOR,bg=colour235,bold

This basically just makes the rest of the tmux UI match my existing styles, using various shades of grey to indicate what’s active vs inactive and the $HOST_COLOR where a non-greyscale colour is needed.

# ACTIVITY
set -g bell-action none
set -g monitor-activity on
set -g monitor-bell on
set -g visual-activity off
set -g visual-bell on
set -g visual-silence off

These basically just set the various options needed to get tmux to listen out for a bell coming from a pane. I think I understood these options when I set them, but if I wanted to change them I’d have to re-read the tmux manual to make sure I got what I wanted.

# POPUP SHELL
bind -n M-J display-popup -T ' +#S ' -h 60% -E show-tmux-popup.sh

set -g popup-border-style fg=colour245
set -g popup-border-lines rounded

# support detaching from nested session with the same shortcut
bind -T popup M-J detach
bind -T popup C-o copy-mode
bind -T popup M-c new-window -c '#{pane_current_path}'
bind -T popup M-n next-window
bind -T popup M-m previous-window

bind -T popup M-L run 'tmux move-window -a -t $TMUX_PARENT_SESSION:{next}'

This is a slight extension of the popup shell I wrote about last year. I changed the shortcut from M-A to M-J as I found that a bit easier to press. I also added a binding to get into copy-mode so I could scroll up in the output.

Against my better judgement I also added bindings for creating and navigating windows. I don’t really use this, but I find the idea of secret hidden windows somewhat amusing.

The same shortcut I use for break-pane will move the window from the popup into the session it is popping up from. Realising that you can move tmux windows between sessions is fun. There are no rules! Isn’t that awesome!

# PUG AND LOCAL
source ~/.pug/source/tmux/pug
if '[ -e ~/.tmux-local.conf ]' {
  source-file ~/.tmux-local.conf
}

I still use my package manager pug, that I wrote in 2017 to manage my shell packages. I’ve since accepted that no one else is going to use it and have just merged it into my dotfiles repo. The only tmux package that this loads is vim-tmux-navigator which I forked from the original in order to make it installable from pug.

It seems a shame to relegate vim-tmux-navigator to the bottom since it’s one of the neatest tricks to make tmux more usable for Vim enthusiasts. But this is what the format demands3. For the uninitiated, it adds shortcuts to Vim and tmux to navigate splits with C-h/j/k/l—so you can navigate the splits interchangeably. I forget that I have it installed, splits are just splits and I don’t have to think about how to navigate them.

All my config files will check for some -local variant and source that if it’s present, which allows me to make per-machine customisations that I don’t want to commit into my dotfiles repo. This is great for work-machine-specific options.

Bonus Round: mx Helper Script

My other interaction with tmux is with a script called mx that originally papered over the list-sessions, attach, and new commands but has since gained responsibility for switch and rename-session.

The gist is that I want to be able to type mx my-session from anywhere and then be in a session called “my-session”. The “from anywhere” requires a little bit of thought:

If we’re outside of tmux, use new-session -A to attach to a session if it exists, or create a new one with that name.

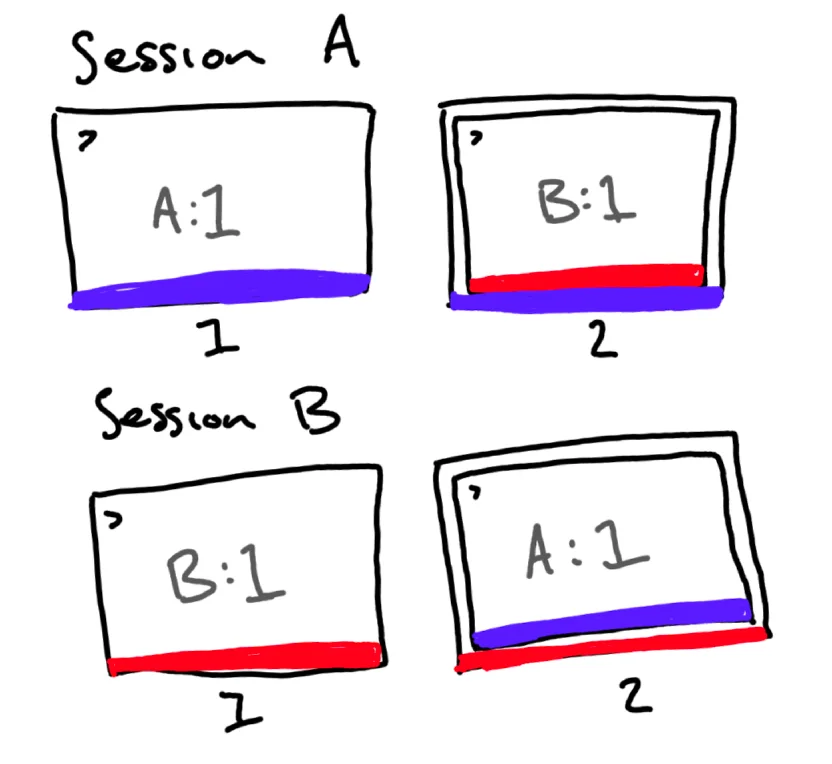
If there’s only one window in our current session, we probably don’t care about the current session staying around. So if the session we’re trying to switch to exists, move the current window to that session, then switch over to it.

If we’ve only got one window and the target session doesn’t exist, we can just rename the existing session to the target session name.

If there’s more than one window in the current session, then create or switch to the new or existing target session and move the current window along with us.

This is almost certainly unnecessary, but it avoids me leaving a trail of sessions that I’ve finished with and avoids me having to exit out of tmux to switch between sessions, which is what I’d have to do previously to avoid the nested-sessions error, since the script would try to attach while already inside of tmux.

  1. If you want to be really naughty, you can do something like this: bind-key -n e if '[ "$(shuf -i 0-1 -n 1)" = 0 ]' send-keys which will silently swallow 50% of “e”s that get typed. You could do all sorts of naughty things here, like adding a sleep before certain characters are sent, or replacing spaces with non-breaking spaces or some other invisible character. 

  2. This is why the shortcut is M-Z (uppercase “Z”) and my “zoom pane” shortcut is M-z (lowercase “z”). 

  3. I am aware that I made up the format and could have chosen to re-order the sections to make this more coherent. 


Optimising for Modification

It is an accepted wisdom that it’s more important to write code that is easily read and understood, in contrast to writing code that is fast to write1. This is typically used in discussions around verbose or statically typed languages versus terser dynamically typed languages.

The kernel of the argument is that it doesn’t take you that much long to write a longer method name, spell out a variable in full, or import a class. Wheres it can take someone reading the code significantly more time if they have to trace and guess at every single variable name and function call to understand what the code is doing.

The classic examples are Java’s excessively long class names, Ruby’s convoluted one-liners for data manipulation, or Swift’s overly verbose method and argument names. For example here’s how you trim whitespace characters from a string in Swift from StackOverflow:

let myString = "  \t\t  Let's trim all the whitespace  \n \t  \n  "
let trimmedString = myString.trimmingCharacters(in: .whitespacesAndNewlines)

Whereas in Ruby it’s just " my string \t".strip.

In Swift, the writer of that code has to know—or lookup—the longer method with a potentially not-obvious argument2, but it would be incredibly clear to a reader what that method is doing. The writer of the equivalent Ruby code would have to remember a single word, but the reader may have to check what characters are included in the .strip operation.

Another example is Go’s previous lack of support for building generic abstractions3. The counter-example was always to just write the code out by hand, using a classic for loop or if statement. So instead of doing this:

buildings.map(&:height).max

You would do something like:

maxHeight := 0
for _, item := range buildings {
  if item.Height > maxHeight {
    maxHeight = item.Height
  }
}

No hidden behaviour, and super easy to understand.


I don’t want to try and argue where on this spectrum is best. I have a different metric that I want to optimise for: the ease of manipulation.

I spend a lot of time changing code to understand how best to implement, refactor, or debug a problem, and languages that are more explicit code end up getting in the way.

I’ll just reach for System.out.println in Java because the fully-productionised logging class requires me to add an import and edit my build config.

I might not use .map and .filter in my final code, but it sure is convenient to have these around to transform data either to print it, or to quickly pass it to another part of the application.

Having static types is absolutely valuable when undergoing a large refactor to build confidence that you haven’t completely messed something up, but when I just want to move some code around to see if I can change some behaviour, having to re-define interface definitions and then contend with anything else that breaks is a frustrating experience. It would be great if I could just turn off type checking in single files while I work.

An easy example of this is when you’re doing something that unifies the behaviour of a bunch of objects, and will almost certainly result in defining some common interface for all the classes to implement. However in the interim you just want the compiler to treat all the objects as being the same shape, despite the fact that from the compiler’s point of view they have absolutely nothing in common.

Since I’m a big printf debugger, languages that don’t have a sensible default for printing objects is a huge pain. Remembering to use whatever the method is that turns a Java array into a human-readable string is the absolute worst. Ruby is great here because every object has a .inspect method that will dump the value of all instance variables, which is incredibly convenient. Of course you could attach a debugger, but having it available programmatically allows you to dump it into your applications UI if necessary, without having to re-run with a debugger attached.

Other times I might want to just:

  • Call a private methods
  • Read a whole file without writing lines of InputStreamReader boilerplate
  • Throw an exception that I didn’t declare
  • Catch that exception somewhere else
  • Redefine a method on an existing class

Swift’s error handling actually has a few of these features—the try! and optional unwrap ! syntax are great examples of convenience features for hacking something together that should never get past a code review.4

Of course it’s no surprise that Crystal has a lot of these features (it is of course the best language ever). Being able to punt some best practices to the back seat is incredibly convenient, and not something that I’ve seen included much in discussions on readability versus writability of code.

  1. Or even fast to run, in some cases! 

  2. They’ve also got to know that in: is the argument label, I find this constantly baffling as charactersIn: seems like it could be an equally-good argument label, so you have to remember both the full “trimming characters in” name of the method, and where in that name the arbitrary separator between what’s the method name and what’s the argument label. 

  3. Until Go added support for generics, which I have not yet used. 

  4. As I wrote before Swift has some weird trade-offs when it comes to exceptions. 


A Successful Experiment in Self-Hosted RSS Reading

For just over a month, my RSS reading has been self-hosted. Usually I’d write about this kind of thing because there was an interesting challenge or something that I learnt in the process, but it has basically been a completely transparent change.

I’m still using NetNewsWire to do the actual reading, but I’ve replaced Feedly with FreshRSS running on my home server (well, one of them).

I didn’t really have any problems with the quality of the Feedly service—they fetch feeds without any issues and most apps support their API, and their free tier is very generous. I’ve had my Feedly account for years. However they use their feed-scraping tools to provide anti-union and anti-protest strikebreaking services, which is a bit gross to say the least.

The ease of moving between RSS services is really what makes this an easy project, as Dan Moren wrote on Six Colours it’s as simple as exporting the OPML file that includes all the feed URLs, and importing that into another service. Dan ended up using the local feed parser offered by NetNewsWire, but I’m morally opposed to having my phone do periodic fetches of 611 feeds when I have a computer sitting at home that could use its wired power and internet to do this work.

NetNewsWire supports pulling from FreshRSS, which is an open-source self-hosted feed aggregator. It supports running in a container, so naturally all I needed to do was add the config to a pod file:

freshrss:
  name: freshrss
  remote: steve
  image: docker.io/freshrss/freshrss:alpine
  interactive: false
  ports:
    4120: 80
  environment:
    TZ: Australia/Sydney
    CRON_MIN: '*/15'
  volumes:
    freshrss_data: /var/www/FreshRSS/data
    freshrss_extensions: /var/www/FreshRSS/extensions

You just do some basic one-time setup in the browser, import your OPML file, add the account to NetNewsWire, and you’re done.

The most annoying thing is a very subtle difference in how Feedly and FreshRSS treat post timestamps. Feedly will report the time that the feed was fetched, whereas FreshRSS will use the time on the post. So if a blog publishes posts in the past or there is a significant delay between publishing and when the feed is fetched, in Feedly the post will always appear at the bottom of the list, but FreshRSS will slot it in between the existing posts. I want my posts to always appear in reverse chronological order so this is a bit annoying.

An example of a website where the times on posts are not accurate is this very website! I don’t bother putting times on posts—just dates—since in 10 years of posts I only have two posts that are on the same day. Feedly assigns a best-guess post of when the post was published (when Feedly first saw it) whereas FreshRSS just says they were published at midnight. Which isn’t too far from the truth, as it’s half past ten as I write this.

To avoid exposing FreshRSS to the outside world, it’s only accessible when I’m connected to my VPN, so I don’t have to worry about having a domain name, SSL cert, secure login, and all that.

I haven’t had any reliability issues with FreshRSS yet, obviously the biggest disadvantage is that I’m signing myself up to be a sysadmin for it, and the time that it will break is when I’m away from home without my laptop.

  1. As of the time of writing, that is. 


Scalability and Capability

I thought of this as a single topic, but when I started writing it I realised that I was really thinking about two different things—scalability and capability—but after writing half of this I also realised that the broader idea that I’ve been thinking about needs to include both. So let’s start with:

Scalability

Desktop operating systems are able to scale to cover so many use-cases in part by their open nature, but also because of the incredible flexibility of windowed GUIs. Every modern mainstream OS has a window manager that works in the same basic way—you have a collection of rectangles that can be moved around the screen, and within each rectangle there are UI elements.

Floating windows is such a good abstraction that it can be used on a huge range of display sizes. My netbook with a tiny 10” screen used the same system as my current 13” laptop. If I connect a huge external monitor, the interactions remain the same—I’ve just got more space to put everything.

What’s really amazing is that there has been almost no change in the window metaphor since their inception. I’m not a computer historian, but I know that if you time-travelled and showed any modern desktop OS to someone using Windows 98 (which ran on the first computer that I used), they would be quite at home. The visual fidelity, speed, and some rearranging of UI elements might be a bit jarring, but “move this window over there” and “make that window smaller” work in the exact same way.

Characterising it as no changes is obviously selling it short. The best change to the core windowing metaphor is the addition of virtual desktops. It fits in to the system really well; instead of having windows be shown on the screen, we just imagine that there are multiple screens in a line, and we’re just looking at one of them. In the relationship of “computer” to “windows” we’re just adding a layer in the middle, so a computer has many desktops, and each desktop has many windows. The best part is that the existing behaviour can just be modelled as a single desktop in this new system.

The difficulty is that this introduces a possibility for windows being “lost” on virtual desktops that aren’t currently visible on the screen. Most window managers solve this by adding some kind of feature to “zoom out” from the desktop view, and show all the virtual desktops at once, so you can visually search for something you misplaced. MacOS calls this “Exposé” and I use it constantly just to swap between windows on a single desktop.

Tablets haven’t yet managed to re-invent window management for a touch-first era. Allowing multitasking while not breaking the single-full-screen-app model is exceptionally challenging, and what we’ve ended up with is a complicated series of interdependent states and app stacks that even power-users don’t understand. Even the iPad falls back to floating windows when an external monitor is connected, as being limited to two apps on a screen larger than 13” is not a good use of screen real estate.

Capability

Something simultaneously wonderful and boring about computers is that while they continue to get better over time, they don’t really do anything more over time. The computer that I bought from a recycling centre for $20 basically does the same things as the laptop that I’m using to write this very post.

On my netbook I could run Eclipse1 and connect my phone via a USB cable and be doing Android development using the exact same tools as the people that were making “real” apps. Of course it was incredibly slow and the screen was tiny, but that just requires some additional patience. Each upgrade to my computer didn’t fundamentally change this, it just made the things I was already doing easier and faster.

Of course at some point you cross over a threshold where patience isn’t enough. If I was working on a complicated app with significantly more code, the compilation time could end up being so long that it’s impossible to have any kind of productive feedback loop. In fields like computer graphics, where the viewport has to be able to render in real-time to be useful, your computer will need to reach a minimum bar of usability.

However in 2020 I did manage to learn how to use Blender on my 2013 MacBook Air. It could render the viewport fast enough that I could move objects around and learn how to model—so long as the models weren’t too high detail. Actually rendering the images meant leaving my laptop plugged in overnight with the CPU running as hard as it could go.

All those same skills applied when I built a powerful PC with a dedicated graphics card to run renders faster. This allowed me to improve my work much faster and use features like volumetric rendering that were prohibitively slow running on a laptop.

A computer render of a small cabin in a foggy forest with a radio mast next to it with sunlight shining through the trees

Rendering the fog in this shot would likely have taken days on my laptop, but rendering this at ultra-high quality probably took less than an hour.

I really appreciate using tools that have a lot of depth to them, where the ceiling for its capabilities is vastly higher than you’ll ever reach. One of the awesome things about learning to program is that many of the tools that real software engineers use are free and open source, so you can learn to use the real thing instead of learning using a toy version. This is one of the reasons I wanted to learn Blender—it’s a real tool that real people use to make real movies and digital art (especially after watching Ian Hubert’s incredible “lazy” tutorials). There are apps that allow for doing some of this stuff on an iPad, but none are as capable or used substantially for real projects.

It’s not just increases in processing speed that can create a difference in capability. My old netbook is—in a very abstract way—just as able to take photos as my phone. The only difference being that it had a 0.3MP webcam, and my phone has a 48MP rear-facing camera. The difference in image quality, ergonomics, and portability make the idea of taking photos on a netbook a joke and my phone my most-used camera.

Portability is a huge difference in capability, which has enabled entire classes of application to be viable where they were not before. There’s no reason you couldn’t book a taxi online on a desktop computer, but the ease and convenience of having a computer in your pocket that has sensors to pinpoint your location and cellular connectivity to access the internet anywhere makes it something people will actually do.

My phone is also capable of doing almost everything that a smartwatch does2, but it’s too big to strap to my wrist and wear day-to-day. The device has to shrink below a size threshold before the use-case becomes practical.

Of course the biggest difference between any of the “real computers” I’ve mentioned so far and my phone is that it has capabilities locked by manufacturer policy. It’s much more capable from a computing power standpoint than any of my older computers, and the operating system is not lacking in any major features compared to a “desktop” OS, but since the software that can run on it is limited to being installed from the App Store and the associated rules, if you wanted to write a piece of software you’d be better off with my netbook.

My iPad—which has just as much screen space as my laptop—can’t be used for full-on development of iPad applications. You can use Swift Playgrounds to write an app, but the app is not able to use the same functionality as an app developed on a Mac—the app icon doesn’t appear on the Home Screen, for example. If this was a truly capable platform, you would be able to use it to write an application that can be used to write applications. Turtles all the way down. On a desktop OS I could use an existing IDE like IntelliJ or Eclipse to write my own IDE that ran on the same OS, and then use that IDE to write more software. That’s just not possible on most new platforms.

“Desktop” operating systems are suffering from their own success—they’re so flexible that it’s completely expected for a new platform to require a “real computer” to do development work on for the other platform. This is a shame because it shackles software developers to the old platforms, meaning that the people that write the software to be used on a new device aren’t able to fully embrace said new device.

Once your work gets too complicated for a new platform, you graduate back to a desktop operating system. Whether that’s because the amount of data required exceeds that built into the device (a single minute of ProRes 4K from an iPhone is 6GB), or you need to process files through multiple different applications, you’re much less likely to hit a limit of capability on a desktop OS. So unlike me, you might start on one platform and then later realise you’re outgrowing it and have to start learning with different tools on a different platform.

Smartphones have made computing and the internet accessible to so many people, but with desktop operating systems as the more-capable older sibling still hanging around, there’s both little pressure to push the capability of new platforms, or to improve on the capabilities of older ones.

  1. This was before Android Studio, by the way. 

  2. The exception being that it doesn’t have a heart rate and other health-related sensors. 


40th Anniversary Macs

My current M1 MacBook Air, taken in BitCam

The Upgrade Podcast just did a special episode with panellists drafting various Mac-related things for the 40th anniversary of the original Macintosh. Here are my pics:

First Mac

I was looking for an upgrade to my Acer netbook, trawling through second-hand computers. This was in 2011. My main issue when I’m buying second hand computers is having something be predictable—I didn’t want to spend a bunch of money on something that turns out to be crap. I looked in the “Mac” section and realised that they weren’t that expensive. If I got a Mac, I’d know that it was going to be reasonably well-built, usable on battery, with a half-decent screen, keyboard, and trackpad.

The other advantage of buying a Mac was that it’s easy to know compatibility for installing Linux ahead of time. It’s a shame that the compatibility is “difficult”, but at least you know that up front.

In the end I bought a 2008 MacBook with a Core 2 Duo processor, 160GB hard drive, and 2GB of RAM. The bigger screen and better keyboard made everything easier, compared to my tiny netbook.

I used OS X on it for a while, before installing Ubuntu (I assume version 12.04) on it. I’d occasionally dual-boot but most of my time was spent using Ubuntu. This lasted until probably late 2012 when I realised that Minecraft performed much better on OS X than on Ubuntu, and so ended up spending more time back in OS X.

Favourite Mac

My dad upgraded his 2010 MacBook Pro to a MacBook Air—to reduce weight while travelling—and I got the Pro as a hand-me-down. This ended up being short-lived as he upgraded again to the 11” Air, and I got the previous 13” Air. That 2013 13” MacBook Air, by virtue of being the Mac I used the most and longest, is my favourite Mac. It was my first computer with an SSD, which gave it a huge speed boost compared to the MacBook Pro.

2013 was really when the Air became an awesome all-round computer. The advertised battery life was 12 hours (almost twice that of the previous generation which claimed 7 hours) which meant I could take it to university and leave the power brick at home. At a time when most people had their huge 15” ultra-glossy laptops tethered to a wall outlet, this was awesome.

In a post-dongle world it’s weird to remember the fact that I could plug in power, a mouse, keyboard, headphones, and a display all into the built-in ports on my “entry-level” “consumer” laptop.

Favourite Mac Software

The software that defined my use of the Mac in the 2010s was TextMate. It was the go-to editor for Rails development, and I used it almost exclusively from 2012 to 2017. I’d use an IDE for Java development, but everything else would be done in TextMate.

I still keep it installed in case I just need to do something quickly or wrangle some text with multiple cursors, but most of the time I’ll use Vim to make use of muscle memory and macros.

Favourite Mac Accessory

In 2015 I bought a Magic Trackpad on a bit of a whim. I’d been using the wireless Mighty Mouse when I was working at my desk, but I liked the idea of using a trackpad for everything and must’ve found a good deal on a second-hand one.

Since then I’ve been using trackpads almost exclusively. I replaced the first-generation Magic Trackpad in 2019 since I got sick of the AA batteries running out, and the second-generation trackpad has longer-lasting built-in batteries that can be charged while the trackpad is in use.

I’ve never had any significant RSI issues using the low-profile Magic Keyboard and Magic Trackpad, and so I’m hesitant to make any changes to a setup that works so well.

Hall of Shame

The worst Mac that I’ve used was the 2018 MacBook Pro (with Touch Bar) that I used at work. My first work laptop had to be replaced1 after the “b” key stopped working, but the replacement wasn’t that much better. I didn’t really mind typing on the low-travel butterfly keyboard, but I loathed having no gap between the arrow keys, which made feeling for them with the tips of my fingers more difficult.

In contrast to my experience with the amazing battery life on the 2013 Air, the battery life I would get from the Pro was abysmal. This is in no small part due to the types of work that I was doing on each machine—text editing is a lot less power-hungry than large video calls—but I came to resent the fact that the fans would constantly be maxed out and the battery wouldn’t last through even one hour of meetings.

Thankfully in 2022 I was able to replace this with an M1 MacBook Pro, which has amazing battery life, no fan noise, and never stutters no matter how many browser tabs I have open.

My current personal laptop is an M1 MacBook Air, which I am using to write this post.

  1. Replaced from my perspective, it was evidently easier to just give me a new laptop rather than have me wait on a repair—as much as I would have wanted to keep the exact machine with all my stickers on it.